


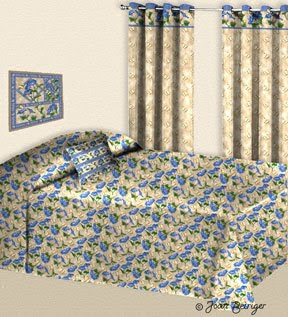
 If you want to WOW manufacturers and really showcase your art with mock-ups for bedroom linens and curtains, you can easily do it in Photoshop. The key is to use templates that have realistic shading and then blending the art (pattern) layer with the template layer by using Photoshop's layer modes. The curtain, bedspread, and pillow example at the left was created by using this technique. The most time consuming part of the process is creating the templates. I made mine by taking pictures of actual products, simplifying them (removed patterns and backgrounds) and converting them to gray scale in Photoshop. Spending the time to create templates is worth the effort because they can be used over and over again. This tutorial shows how to create a pillow mock-up with one of my morning glory patterns.
 Warning: If product mock-ups are too realistic looking,manufacturers may think that the art on them have already been licensed. To avoid confusion, I recommend that you use signage stating that the art is available for licensing.
 4. Go to the pattern layer and hit the delete key. The pattern is now in the shape of the pillow.
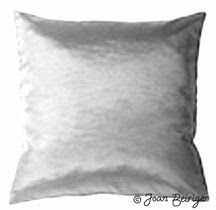
1. Create a shaded pillow template by either taking a picture of a generic pillow or drawing & shading one. Then open Photoshop and place the pillow template on a layer.
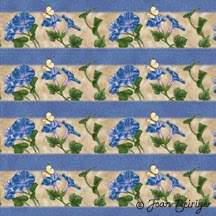
2. Place the art (pattern) in a separate layer above the pillow template layer. Move and/or resize the pattern so that it covers the pillow template.
3. Go to the pillow template layer and select the outside of the pillow with the magic wand tool (Mac & Windows = W).
4. Go to the pattern layer and hit the delete key. The pattern is now in the shape of the pillow.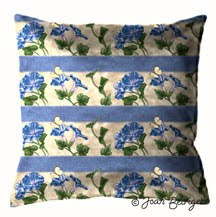
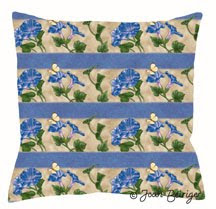
5. Select the multiply mode by pulling down the pop-up menu at the top of the layers pallet. Voila! You now have a realistic looking pillow. Simple isn't it?
Note: If the pillow is too dark, merge the two layers together, and use the Curves Tool (Mac = Command + M; Windows = Ctrl + M) to lighten it.
Very cool! Thanks Joan!!!
ReplyDeletethanks joan! im completely self taught in photoshop and this helped me very much!
ReplyDeleteJoan, Thank You!
ReplyDeleteI just did this and it worked the first time! Easy peasy!
I love your articles as well, Thanks so much for sharing this information with us!
You are a blessing!
Sheila
Six years later and your article is still helping people (me, for one). Thanks for your generosity. I'm new and getting so much out of your blog articles. Please write a book for us. My printer's running out of paper!
ReplyDeleteThanks Joan for this great tutorial. I'm using cs4 and can't get past the error that my smart object can't be edited. It won't let me delete the pattern in step 4 and hit the delete key. I've tried everything I can't think of but it just won't let me. I've tried flattening it, but when I revert back to the mock up it still shows as a smart object that is not editable. Do you have any insight you could share? Thanks very much.
ReplyDeleteYou are welcome Darlene. I think your problem is that you need to rasterize your pattern which is a smart object. Select the pattern and select the Layer menu at the top of the monitor, select Smart Objects and then select Rasterize. Note: I rarely use Smart Objects in Photoshop and rasterize it when I bring in an image from Illustrator.
ReplyDelete