


 By using Adobe Illustrator 3D effects, you can create your own unique product shapes, map your art onto the surface and rotated the shape and art to any position you wish. This tutorial shows you how to create complex shapes for a vase, a bowl, and a cocktail glass. Before following this tutorial, I suggest that you first read "Illustrator Tip: Mockups (Step 1) - Creating Simple 3D Objects" so that you know the basics in creating 3D objects. Also read "Illustrator Tip: Mockups (Step 2) - Placing Art onto 3D objects" because mapping art onto 3D objects is not covered in this tutorial. Once you understand the concept in creating complicated product shapes, you'll be able to make an endless variety of product objects to showcase your art.
Warning: Product mock-ups can look realistic when art is placed on 3D objects. If they are too realistic looking, mock-ups may look like actual products and manufacturers may think that the art on them have already been licensed. To avoid confusion, I recommend that you use signage stating that the art is available for licensing when you use realistic looking mock-ups in marketing materials.
Basic Shape for a Vase
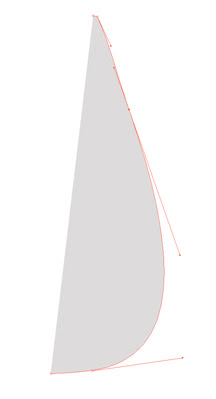
The first step in creating a complex 3D object is to create half of the shape's side view by using the pen tool (Mac & windows = P). Note: I recommend that you do not use the brush or pencil tool to create the shape because they lay down too many anchor and beizer handles which makes the shape bumpy. It also takes longer to render the shape into a 3D object if there are too many points. Using the pen tool can be tricky and frustrating at first. If you don't know how to use it, view a tutorial on youtube.com to learn the principles in using the pen tool.
The example at the left shows that I used a minimum number of anchor points and beizer handles to define the shape and that I did NOT close the path. In other words, the last point at the top of the shape and at the bottom of the shape are not joined together. This is important in creating 3D objects. Also notice that I did not draw a path all the way across the top of the shape. The reason is create a hole in the middle of the vase. Although, if you look down the hole, it will not be straight but a wedge. Drawing only the outside is a fast method when you do not need to see the inside of the shape. I also did not place a beizer handle in the middle of the curve. It is easier to get a smoother curve that way.
Choose a fill color in the color menu at the bottom of the tool bar but don't choose an outline color. I chose a light grey for all the examples.
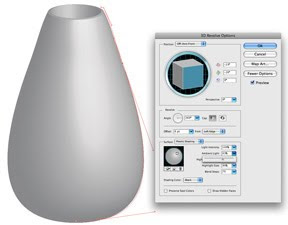
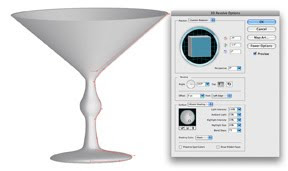
The second step is to click on the shape to select it. Then go to Effect on the Menu bar (at the top of the monitor) and select 3D Revolve. The 3D Revolve Options window pops up. Select the preview button so that you can see the shape as a 3D object and make any adjustments you wish. Note: It is best to experiment with the different adjustments so that you become familiar on how they affect the position and shading of the object.
Basic Shape for a Bowl
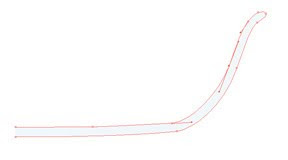
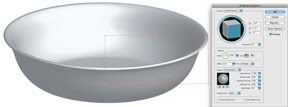
You essentially do the same steps as were done in the above example but creating a shape for a bowl is more complicated than for the vase. Because you can see the inside of the bowl, you need to draw essentially the thickness of the bowl. Notice that I did not close the path between the upper and lower points on the left side of the shape. Below is what the bowl shape looks like once the 3D Revolve effect is applied.
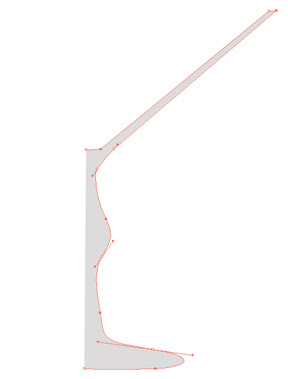
Basic Shape for a Cocktail Glass
A shape for a cocktail glass is a little more complicated to draw than the other examples. However, the same principal and steps apply. And once again I did not close the path between the inside and base of the glass. Below is what the glass shape looks like once the 3D Revolve effect is applied.
Joan, once again, thanks so much for your tips on using Illustrator. I love using Illustrator, and it's always great to see the design approach that other artists use for making product mockups.
ReplyDeleteLiz