


Creating kitchen textile or any flat product mock-up is easy to do because it only involves placing art on top of the template and deleting everything outside it. In this tutorial, I'll show how I create an apron, oven mitt and potholder mock-up by using templates and a pattern from one of my art collections.
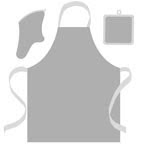
1. Create three templates - apron, mitt and potholder shapes. Templates can be created by tracing a picture of a generic shaped apron, mitt and potholder or drawing your own shapes in Photoshop. In this example, I created a basic apron shape on one layer and the apron ties on another layer. I did the same for the oven mitt and potholder. The basic shape of the mitt, potholder and the trims for each are on separate layers. Therefore, there are six layers for these three templates.
2. Place a pattern of art in a separate layer. Make another copy of the pattern by holding down the option button (Windows = Cntl) and drag the pattern to the right. Do this again so that you will have the same pattern on three layers for use on the three templates.
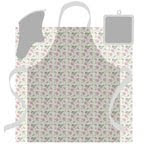
3. In the layers window, make one of the pattern layers 50% opacity. Move the pattern on top of the apron template and resize it by using the free transform command (Mac = command + T; Windows = cntl + T).
4. Go to the basic apron template layer and use the magic wand tool to select everything outside the template. Go to the pattern layer and push the delete key. You should now see the pattern in an apron shape.
5. Go to the apron tie template layer and use magic wand tool to select the inside of the ties. Press the delete key to remove the color and then use the paint bucket tool to fill the ties with your color choice.
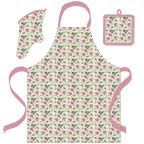
6. Repeat steps 3 through 5 for the oven mitt and also for the potholder. You now have a kitchen textile mock-up.
Hint: Arrange the mock-ups attractively on a page as shown at the beginning of this tutorial. Also merge the layers of each mock-up and use the Layer Style command / drop shadow effect. Select the "fx" button at the bottom of the Layers palette and choose the drop shadow effect from the pull down menu. By adding the drop shadow, you make the mock-up "pop."
Copyright © 2009 Joan Beiriger
Great info Joan, thanks! I'm used to working in Photoshop, but didn't think about adding a drop shadow to mock ups.
ReplyDeleteBTW, why do you make the pattern at 50% opacity? I've never heard anyone mention that before.
Stephanie
Thanks for asking about the opacity of the pattern. The reason why I use 50% opacity in the pattern layer is so that you can see the template (layer below the pattern layer) and then can easily center the pattern over the template. What I forget to tell you in the tutorial was that afterwards you need to make the pattern layer 100% again. Whoops!
ReplyDeleteI'm glad that my tutorials are of help!
ReplyDeletegreat tutorial, Joan! you have the best blog and are so generous!!! thanks!
ReplyDelete