


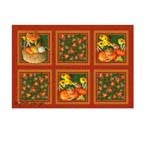
 I consider the free transform command the most versatile tool in Photoshop. I use it constantly to size, distort/shear, and rotate images. The following steps shows you how to shear horizontal formatted art for a placemat mock-up. Similar steps can be used to shear art for decorative flags, gift bags, and box mock-ups.
In my mock-up example at the left, I placed a mug (created in Photoshop) on top of the placemat to better show what kind of product it is. You could also put silverware next to the placemat. Hint: I placed the art behind the mock-up because it isn't easily visible in the mock-up. This is a good practice when sending out tearsheets to manufacturers.
1. Place the horizontal image in a separate layer in Photoshop.
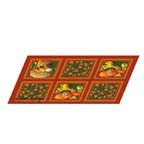
2. Move the art to the left side of the window. Select the free trans
form command (Mac = Command + T; Windows= Ctrl + T). A rectangle appears on top of the art that has small squares in each of the corners and middle of each of the sides called handles. Hold down the Command key (Windows = Ctrl key) and drag the center top handle to the right and down to shear the art. Note: If you are not satisfied with the shape (the dimensions/angle of the art looks wrong), adjust it by using the corner handles. Push the enter button to complete the command. It's that easy. You now have a placemat mock-up.
Below are other examples of mock-ups that can be created using the free transform command.
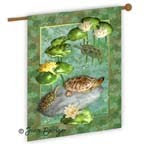
Decorative Flag Mock-up
Put the vertical art and mock-up flag pole (drawn in Photoshop) into separate layers. Place the art on the top layer over the flag pole layer and use the free transform command to shear the art.
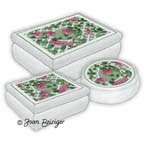
Box Mock-ups
Put the art and mock-up boxes into separate layers. For this example there are three art layers and three box layers. Use the free transform command to rotate the art on top of the box (move the cursor outside the bounding box and drag). Then shear a square formatted art onto the square box, a horizontal formatted art onto the horizontal box, and a round formatted art onto the round box. I created the three shapes of boxes in Photoshop for use in my mock-ups.
Copyright © 2009 Joan Beiriger
Joan great tutorial! :) Look forward to displaying with you in Altanta!
ReplyDeleteThanks Joan! You have a treasure trove of info on here! wonderful of you to share!
ReplyDeleteLuanne
So nice to correspond with you--Thanks for these great tips!
ReplyDeleteSydney
these are great!
ReplyDeleteYou are very sincere and generous Joan. I Have learned so much from you just by reading parts of your blog and your posts online. Thank you so very much. I am grateful
ReplyDelete