


Creating a Pattern and Using the Pattern Overlay Effect
A pattern is created as an image or a set of icons and is repeated (tiled). You can create your own custom pattern by using any motifs that are created in Photoshop or your own painted and scanned ones. You define the motifs as a pattern in Photoshop by selected the image with the marquee tool and select Edit / Define Pattern. You apply the created pattern to a layer by selecting the pattern overlay in the blending options effects (Layer /Layer Style / Pattern Overlay) or in the layers window click on the fx symbol at the bottom and select Pattern Overlay ... to open the Pattern Overlay window.
View "creating a Photoshop pattern" video to see a demonstration on how to create your own pattern and apply it to a layer by using the Pattern Overlay effect in Photoshop. The Pattern Overlay window allows you to adjust the scale of the patterns, the opacity, and use the Blend Mode effects. Note: As mentioned in the video, the layer cannot be blank but must have a color or image on it for the pattern to be visible. The color/image does not have to fill the entire layer. Hint: If you wish to have a transparent background for your pattern so that it can be used on any color or motif, make sure that the layer that the pattern was created on is transparent and none of the layers below it are visible including the background layer.
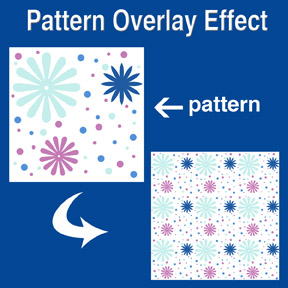 The picture at the left shows the initial pattern that was created in Photoshop with the brush and custom shape tools on a white background. Notice that none of the icons are cut off but are within the boundaries of the sides. This is to avoid imperfect repeating when the pattern is tiled. As was stated above, the background could have been transparent when the pattern was created so that it could have been placed on any color background. The repeated pattern in the example was created with the Pattern Overlay and was scaled down to about 20% while in the Pattern Overlay window.
Using the Pattern Stamp Tool
Using the Pattern Stamp tool (located on the tool bar behind the Clone Stamp tool) is an easy way to brush a partial pattern onto the layer. This adds interest to a background or motif. The tool has several options (located along the top of Photoshop's window) - brush selection, layer styles (mode), opacity, pattern selection. The only draw back to the Pattern Stamp tool is that the size of the pattern cannot be altered as it can in the Pattern Overlay. View the video "How to use pattern stamp tool in Photoshop (CS5 CS4 CS3, CS2 etc) tutorial" on how to use the Pattern Stamp tool. Note: The mouse has to be constantly held down while applying a pattern for it to be continuous. The tiling of the pattern is reset after the downward pressure of the mouse is released. Hint: Interesting textures to the pattern can be achieved by using textured brushes and even a variety of brushes on the same layer.
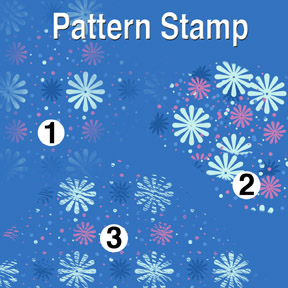 The patterns at the left were created with a transparent background pattern (same pattern as used in the Pattern Overlay example) and various brushes. The Star Burst brush was used for pattern number one (1), Flat Angle brush for number two (2), and Dune Grass brush for number three (3). The mouse was held down to get a continuous pattern for both number 1 and 3. On number 2, several iterations of pressing the mouse while applying the pattern and then releasing it created the collage look.
Creating Patterns with the Pattern Maker Filter
The Pattern Maker filter located in the pull down filter window is already loaded in Photoshop for version PS3 and below. However, for version PS4 and above it is an optional plug-in. It must be downloaded from Adobe's website. Pattern Maker slices an image and reassembles it randomly to create a tiled pattern. The image can be sampled and a pattern generated numerous times until you get a pattern that you like well enough to save as a pattern preset. Once saved as a pattern preset, it can then be used with the Pattern Stamp tool and Pattern Overlay effect. View "Photoshop Tutorial - Filters: Pattern Maker" and "Photoshop CS5: Tutorial Using the Pattern Maker Adobe Training Lesson 8.6" videos on how and when to use Pattern Maker.
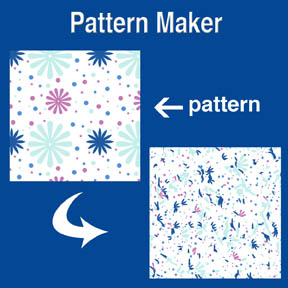 The picture at the left shows the initial pattern and the resulting scattered pattern that was generated in Pattern Maker. Using a pattern like this with Pattern Overlay or the Pattern Stamp tool makes an interesting background or border for your art collection.
Free Patterns
There are many websites that offer patterns (some free) for you to download. You can google the internet or start with "250 Free Design Patterns" and "900 Photoshop Patterns" found on artist Kate Harper's blog. Remember to get permission for commercial usage and check the copyrights before using any patterns found on the internet.
Related Articles
• "Creating Repeat Patterns with Photoshop, Illustrator and Artlandia Plug-in Software"
• "Photoshop Tip - Easy to Create Stripes and Plaids"
Comments are welcome. Post yours in the comment section (below).
Morning Joan, Always nice to see a Photoshop lesson. I find so many people not using Photoshop to it's fullest capacity! It can do so much and we all work in it differently!
ReplyDelete