Joan Website | Joan Bio | Joan Licensing Info | Joan Contact Info | Blog Main Page

Art Licensing by artist Joan Beiriger: I'm happy to share art licensing info but please
give me credit and link to my blog when using it on your site. Thanks.

Showing posts with label Computer / Software Tips. Show all posts

Sunday, June 4, 2017

Art Licensing: Tips on Using MacOS Cool Apps and Tricks

Macintosh computers operating systems (OS) have time saver options, robust ways to find and organize files, and other cool things that many Mac computer users may not know about. The newer MacOS applications (apps) have updated OS apps. Therefore, not everything mentioned in this article will be available to users depending on Mac operating system they are using. For instance, the use of Tags to organize files and to easily locate a file is not available on Mac computers if the OS is not OS X Mavericks (OS 10.9) or greater. And the use of Labels to colorize the text below files and folders is only available if the MacOS is less than OS X Mavericks.

• Paste text without its original format
Have you ever been about to "tear your hair out" when copying an article headline from a website and pasting it into an email or Microsoft word document and the font is different, a huge size, and spaced way down the page than the font you are using? What a pain to correct it so that it is the same format and size as the one you are using in the email!

TIP: Instead of using the normal Command V keys on the keyboard to paste the copied text, use Command/Option/shift/V keys and the copied text format will be the same format you are using in your email. Now that is a time saver!

• Using Emoji characters  ❤️  😀  🌺
In case you do not know, the colored smiley faces and other symbols used on social media sites and emails are called Emoji. Emoji (comes from the words picture and character) originated on Japanese mobile phones in the late 1990s and became popular worldwide when Apple's iPhone supported them. Note: Not all email clients or devices support ALL Emoji and some Emoji may look different in emails supported by different clients and on various devices.

Emoji, pictographs, and many other characters can be found in the Finder Special Characters app.
1. Go to Finder and click on Edit to open the window.
2. Then click on Special Characters to open its window.
3. While in an email (or social media site or other applications that support Emoji), double clicking on one of the Emoji or other characters in the Special Character window and it will be transferred to the email.

A lot more Emoji characters are available than in the MacOS Special Characters app. The one that I like is emojipedia.org because it shows what the character looks like when used on various devices and social media sites.

Did you know that Emoji and symbols could also be placed in an email subject line? I often receive emails from companies with an Emoji character in the subject line. What a great way to get attention and differentiate your email from others! Read the thought provoking article "Using Emoji and Symbols in Your Email Subject Lines" that describes how to use Emoji in place of words or complement words and to engage and connect with the person you are sending the email to.
• Highlighting file and folder names
If your desktop is full of files and folders, it may be difficult to spot the one you wish to open. One way to differentiate them is to use colored text labels for files and folders by using the OS Finder/Label app. Note: This is available with Mac OS that is previous to Mavericks (OS 10.9). With OS X Mavericks (OS 10.9) and greater, the Finder/Label app was replaced with the Finder/Tabs app that helps organize files and folders. Instead of colored text, a dot that can be colored is placed in front of the text. To find out more about Tags, read "Tags to help organize files" section in this article.

Do the following to change the color of the text below a file or folder.
1. Click on the file or folder on the desktop that you wish to change the text color.
2. Click on File in the Finder app. And then, click on one of the seven Label colors (Finder > File > Label). The original color of the text will be replaced by the color selected.
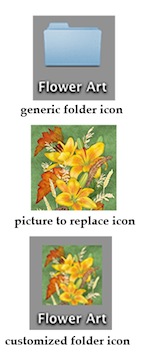
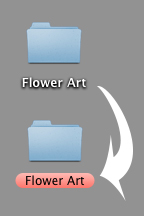
• Customize the original file folder icon
Another way to easily differentiate folders on the desktop is to replace the original folder icon with a picture that pertains to the files in the folder. For instance, if the folder has flower files in it than a flower picture could be used to replace the generic folder icon as shown above. Or, use Photoshop or another application to create a word image on what type of files are in the folder (i.e. flowers, licensing info, contracts, trade shows, copyrights, Ads, photos, etc.) and use it to replace the generic folder icon. Another suggestion is to use the logo from a particular manufacturer website for the folder that has files related to that manufacturer.

Do the following to customize file folder icons
1. Copy to the clipboard (Command C) the picture you want to use. A low-resolution jpg image is recommended.
2. Click on the folder on the desktop.
3. In Finder choose File > Get info to open the Info window.
4. At top left of the Info window, click on the generic folder icon and paste the picture from the clipboard (Command V). The generic folder icon is replaced with the picture and is now visible on the folder.

• Tags to help organize files (OS X Mavericks and above)
OS X Mavericks (OS 10.9) includes Tags with a powerful way to organize files. With Tags, files can be organized by project without having to move them into a folder. Tags automatically appear in the Finder sidebar, so it is easy to find tagged files no matter where they are located. Read more about it in "OS X: Tags help you organize your files"
https://support.apple.com/en-us/HT202754

• More Cool Things
Below are articles about more MacOS cool things.

– "How to Customise Your Mac: 15+ Cool Ways to Do It Quickly" shows ways to personalize OS desktop, menu bar, finder, and preferences to your specifications. Note: The author of this article used Mac Sierra (OS 10.12) so not all Mac OS app tips shown will work the same way on the OS you are using.

– "The 50 best Mac tips, tricks and timesavers". Some of the tips in this article will require recent versions of the Mac operating system such as the latest OS X Sierra – but not all of them do. This article has too many nifty tips to list and I recommend that you flip through it to find some amazing cool things.

Your comments are welcome. Click on the comments section (below) to write your comment. Note: Some people have a problem in leaving a comment. The most successful method is to comment as Name/URL (your name and website or blog with a "complete" URL address. For example: http://www.joanbeiriger.com/

Sunday, September 6, 2015

Art Licensing: Photoshop Tip - Use Droplets to Save Time

Artists that use Adobe Photoshop may be aware that the Actions Command allows a person to do repetitive tasks by recording a series of commands that can be used for batch processing of files or for one image at a time. But they may not be aware that Photoshop makes it even easier to use Actions by creating droplet applications with those actions. A droplet is a mini application that can be saved anywhere on the computer or even shared with other artists that use the same or later version of Photoshop. When a single or group of images is dragged onto the droplet, the droplet launches Photoshop and starts applying the action to each of the images. This is a great way to speed up workflow and avoid boring tasks in doing the same repetitive steps on numerous images. Read "Creating Droplets" to learn more about droplet apps.

Droplets can be used to do repetitive tasks in numerous ways such as
1. Change the file(s) size and/or format.
2. Edit images (apply drop shadows, patterns, textures, text, etc.).
3. Place the copyright symbol and signature on the images.
4. Watermark the image(s).
5. Add image(s) to a contact info page for submission to manufacturers.
And of course, much more.

• Tutorials on creating actions and droplets
– Change Photoshop psd files to jpg
Read and view "Bulk Image Compression with Photoshop Droplets" (simple step-by-step tutorial and a video showing how to convert files with the Actions Command and droplet).

– Change file size
View "Create Droplet in Photoshop" (video on re-sizing images with the Actions Command and droplet).

– Add a copyright and signature to an image
View "Graphic watermark Photoshop tutorial" (video placing a signature on an image with the Actions Command and droplet. Hint: Also add the copyright symbol to your signature or printed name. And, if you wish add your contact information to the image.)

– Add a watermark to an image
View "Photoshop - Actions & Batch Processing" (video showing how to place a transparent watermark on an image with the Actions Command. Note: a droplet can be created for this action. Use the information from other tutorials to make a droplet.)

– Do multiple actions (resize an image, apply a watermark, and save it as a jpg file)
Read " How to create a droplet in Photoshop" (step-by-step tutorial on creating multiple actions with the Actions Command and droplet)

• Additional Information about actions and droplets
– Pausing an action
Sometimes when you are doing batch processing with the Actions Command, you need to pause the action. For instance, you may want to pause the action to change the title of the image on a submission page. To find out two ways you can pause the action, read "Can I have a Photoshop action pause itself to wait for user input?" That action can than be made into a droplet. When using the droplet, it will pause so that you can change the title with the text tool. And then, when you press Okay the action will continue.

– Problems with droplets
Droplets have been reported that they stop working when they were created with Photoshop CS3, or CS4, or CS5 and the Macintosh operating system was upgraded to Lion. To find out more and how to fix the problem, read "Droplets don't work | Photoshop CS5, CS4, CS3 | Mac OS X 10.7 (Lion)".

• Related Articles
– “Software Tip: Resizing Multiple Images etc. via Batch Processing

– “Photoshop Tips: Improve Workflow with Photoshop Actions Command

Your comments are welcome. Click on the comments section (below) to write your comment. Note: Some people have a problem in leaving a comment. The most successful method is to comment as Name/URL (your name and website or blog with a "complete" URL address. For example: http://www.joanbeiriger.com/ ).

Tuesday, December 16, 2014

Art Licensing: Tips on Using the Indispensable Mac Preview App

One of the most useful application that is included with Macintosh OS X operating system is Preview. Preview makes it fast and easy to view and edit pdf, jpeg, tiff, png, etc. files. Also image files such as Adobe Photoshop and Illustrator can be opened in Preview as non-layered files.

Preview also has other functions such as scanning documents or photos, sharing files via email or chat, changing the file format, capturing screen shots, editing photos, and batch processing actions. Learn how to use these functions by reading the articles listed in the Related Articles section at the bottom of this post.

Note: The features found in Preview for the Mac are available in Windows QuickView for PCs. However, QuickView is no longer shipped with Windows. But a third party equivalent that supports XP, Vista and 7 is available according to the QuickView section in Wikipedia.

PDF files
Preview is best known as an alternative to using Adobe Reader or Adobe Acrobat to view and alter PDF files. It is faster to launch Preview than Reader and had lots of useful features. PDF documents can be combined; pages can be moved between PDF files, reordered and rotated. Pages can be bookmarked, comments added, background color changed, view a PDF slideshow, a rectangle or circle can be drawn to emphasize an area. It also has other features depending upon the OS X Preview version. For instance, OS X Lion Preview version and greater allows PDF documents to be digitally signed. Note: Preview does an excellent job in displaying large PDF documents and allows some editing and other features, which may be all that is needed. But, it does not have all the bells-and-whistles of the latest versions of Adobe Reader and Acrobat support.

Images
As an artist, I find the Preview app viewing function indispensable as I manipulate and edit my art and collections into pleasing compositions. Preview also includes helpful tools such as the ability to add text to the image, some image editing capabilities, batch processing, view slideshows and animated gif files, and change file formats. It is much faster to open an image in Preview and use Previews functions and tools than to open the image in Photoshop or Illustrator to do the same thing.

A single image or several images can be dragged onto the Preview app to open it. Or, images can be opened from the Preview app. Or, if the image file is a jpg, png, etc., it can be opened in Preview by double clicking on the image. To temporarily open images in Preview select the image or images with the mouse and then hold down the command key and push the Y key. Hint: Place the Preview app in the desktop tool bar so that it is easily accessed.

Useful ways of using Preview

• Viewing Images
– When manipulating parts of the image in Photoshop, it is difficult to look at the entire image to determine if the composition is pleasing and balanced unless you standup and move away from the monitor. I have found that it helps to instead reduce the size of the image when viewing the composition. A quick way to do that is make sure the Photoshop file is saved and then open the image in Preview by selecting the file, hold down the command key, and pressing the Y key. The image in the Preview window can be quickly enlarged or reduced by pulling on the bottom-right window handle. For information about composition read "Creating Licensable Art: Composition Tips"

– Using Preview to view multiple images in one window is a wonderful way to compare the images and determine if the collection is cohesive. Select all the images you wish to view at one time and use the command and Y key strokes to open the images in Preview. The four images displayed together at the top of this article is an example of opening multiple images in a Preview window.

– If you have a large photographic reference library like I do, you may have trouble finding what photos you wish to use as a reference for new art. By selecting a slew of images in a folder and opening them in Preview you can quickly scan and select the ones you wish to use.


 • Marking Images to be edited
When refreshing art, adding images to a collection, and working with art directors, there are times that you may want to mark changes and write comments on the image. Instead of printing the art and marking-it-up by hand, Preview allows you to do it on image files. See an example of a mark-up on the above tulip image.

• Labeling Images
Preview allows you to quickly label images with copyright and contact information. This is helpful if you want to place the image on a blog or submit it to manufacturers for licensing consideration.

• Changing size, resolution, and formats
Images can be resized; the resolution and the format can be quickly changed in Preview. So instead of waiting for a large high resolution file to open in Photoshop, Preview can converted it to a smaller size, lower resolution jpg file in a fraction of time. That is very useful when submitting art to manufacturers for licensing consideration.

• Rotating images and editing color
In Preview, images can be rotated and colors adjusted. I found the ability to rapidly adjust the color saturation useful when placing images in the sidebar on my blog. For some reason, when images are placed in the sidebar the color saturation is reduced. Thus, I need to increase the saturation of the image before placing it in the sidebar.

Related Articles

While in Preview, open Help at the top right of the function bar to find out how to use its many functions. Also read the following articles for more information on using Preview.

• "Mac Basics: Preview app views and edits images and PDFs"

• "What IS Preview (and Why You Should Use It)"

• "Scanning with Preview in Mac OS X"

• "How to use Preview in OS X Lion to digitally sign documents".

Your comments are welcome. Click on the comments section (below) to write your comment. Note: Some people have a problem in leaving a comment. The most successful method is to comment as Name/URL (your name and website or blog with a "complete" URL address. For example: http://www.joanbeiriger.com/ ).

Tuesday, October 21, 2014

Art Licensing: Using PDF Files to Submit Art

Manufacturers want art submitted to them for possible licensing consideration in different ways. A few want hard copies or a CD of images sent to them via snail mail but the majority accept and want them as single image tiff files, jpg files, files in a folder as a compressed zip file, or in a multiple image pdf file.

If the files are sent via e-mail, the artist must take into consideration the size of the files attached to the e-mail. Many e-mail providers limit e-mails to 2MB in size. So the number of files attached is limited and the size of each must be small. Other alternatives are to upload more and larger file(s) onto file sharing sites such as Dropbox, Hightail (formerly YouSendit), and WeTransfer. And then send a link to the manufacturer so the file(s) can be downloaded. Note: Not all manufacturers use each of these file-sharing sites and they may have a preferred one. Or, they may not want to download any images and will only accept single images attached to an e-mail.

The only way to find out what is preferred is to look at the manufacture guidelines on their website (if posted) or call and ask. Or, take a chance and submit a small sampling of art as jpg images in the e-mail and ask what method they prefer. Note: I usually send one jpg image with a short introduction e-mail and then follow-up with a pdf file with multiple images that can be downloaded from Hightail. If the file is not downloaded, I then know that either they do not want to download the file or they are not interested in my art enough to want to download more images.

The advantage in using a pdf multiple image file when submitting art is that the images can be placed into the pdf file so that they can be easily viewed as a "slide show" by using the free application Adobe Reader that most manufacturer art directors already have. Each image in the pdf file can be printed and download onto the desktop. The pdf file can also be opened in the Macintosh operating system with the Preview application or in the Preview Pane* in Windows operating system. Note: jpg and pdf files are already compressed and they will not be dramatically reduced further if zip compression is used on them.

*There are complaints that the Preview Pane does not open pdf files in Windows version 7 and 8. I suggest that you Google the Internet with "can windows preview pdf files in Windows 7 and 8" if you want to find out if there is a work around for the problem.

Preparing PDF multiple image files
When submitting any images for licensing consideration, the images should have the artist contact information on it. See the image at the beginning of this article for an example. Some artists prefer to place a watermark (copyright symbol and artist name) on top of the art to protect their copyright. However, many manufacturers feel watermarks detract from the art and discourages using them.

Hint: To avoid doing repetitive tasks such as placing contact information on numerous images, you can use Actions in Photoshop to record a series of commands when adding the contact information to an image. You can then play back this action in the Batch or Create Droplet commands that are available in Photoshop under File/Automatic so that the action can be applied to one or multiple images. A video example on how to use Actions and Batch commands can be viewed on "Photoshop - Actions & Batch Processing".

Multiple Image PDF Applications
The following tips show how to created pdf multiple image files in Adobe Photoshop, Adobe Illustrator, Adobe Bridge, and Adobe Acrobat Pro. If you have purchased Adobe Creative Suite or have subscribed to Adobe Cloud, you should have access to all these applications.

Acrobat Pro with the PDF Portfolio command allows the inclusion of not only image files but other application files such as Microsoft Word and Excel. However, Photoshop and Bridge only allows image files. Being able to include art and a biography if written in Word or another application may be very useful when submitting art to manufacturers as a pdf file.

Warning: Images can be added and text placed on the image when in the pdf command of Photoshop and Acrobat Pro. The text is separate from the image and if the image is selected and dragged to the desktop the text will not be on the image. Thus, this is not a good method of putting contact information on an image. Contact information should be placed in the file before adding it to the PDF Presentation or PDF Portfolio.

• Adobe Photoshop (how to create a simple PDF Multi-Page Document or Presentation)

– Quick tutorial written by artist Jill Meyer
1. In Photoshop go to File > Automate > PDF Presentation.
2. Choose either Multi-Page Document or Presentation (slide show), upload the images, press Save. 3. Fill in the name of the PDF, select where to save the file, and press Save.
This may take a little while to process and the pdf file to appear depending on the amount and size of the files in it.

– More detailed tutorial written by Peter Bauer from Photoshop CC For Dummies – "Create a PDF Presentation in Photoshop CC"

– For those that prefer watching videos look at "How To Combine Multiple PDF Pages in Photoshop"

• Adobe Illustrator (how to save multiple PDF files in Illustrator)

– Tutorial video by howtechgraphics - "How to Save File as PDF in Illustrator"

• Adobe Bridge (how to create a multiple page PDF file using Bridge)

– Tutorial written by Noragu - "[Adobe Bridge CS5]: An alternative for Photoshop's PDF Presentation"

– Tutorial written by Barbara Obermeier from Photoshop CS6 All-in-One for Dummies - "How to Create PDF Presentations from Photoshop CS6 Files in Bridge"

– Tutorial video by Mary Castillo – "How to create a PDF in Bridge"

•Adobe Acrobat Pro (how to create a multiple file PDF Portfolio)
According to Adobe "A PDF Portfolio contains multiple files assembled into an integrated PDF unit. The files in a PDF Portfolio can be in a wide range of file types created in different applications. For example, a PDF Portfolio can include text documents, e-mail messages, spreadsheets, CAD drawings, and PowerPoint presentations. The original files retain their individual identities but are assembled into one PDF Portfolio file. You can open, read, edit, and format each component file independently of the other component files in the PDF Portfolio." For more information, read "PDF Portfolios."

– Tutorial written by artist Joan Beiriger
1. Open Adobe Acrobat Pro and a menu window will open.
2. On the right side under Getting Started double click on Create PDF Portfolio and another menu window will open. Click on Add Files at the bottom of the menu.
3. The menu for selecting the files opens. Find the files in the folder or the desktop and select the them. Press Finish.
4. The Portfolio menu opens. This can take a while depending on how large and how many files you select. I recommend that you do a trial run and only add one file to discover how long it takes. Otherwise, you might think nothing is happening.
5. Once the files are loaded they are visible in the window. You can move to the next image in the window with the arrow. You can also move the image placement by selecting and moving the smaller images at the bottom. Also more images can be added by clicking on Add Files that is located at the top of the side bar in the window.
6. Once you have added the files to the Portfolio go to File / Save As / PDF Portfolio.
7. Name the file and location (desktop or folder) you want it saved and press the Save button. The pdf file will appear in the location you indicated once the file is saved. It may take a while if the file is large.

– Tutorial video by lynda.com "How to create a PDF portfolio"

Your comments are welcome. Click on the comments section (below) to write your comment. Note: Some people have a problem in leaving a comment. The most successful method is to comment as Name/URL (your name and website or blog with a "complete" URL address. For example: http://www.joanbeiriger.com/ ).

Monday, August 4, 2014

Photoshop Tips: Using the Modify Selection Commands to Alter Motifs

Adobe Photoshop (PS) has so many tools and commands that it is difficult to know them all. Most PS users know that they can select an image with the lasso, or marquee, or magic wand tools but few realize that once an image is selected the selection can be changed various ways with the modify commands (border, smooth, expand, contract, feather). And, by modifying the selection and using other tools and filters on the image, an artist can quickly change the shape of the motif and/or achieve interesting effects. Below is an example on how to use each of the modify commands. But, depending on how they are used with PS tools and filters, different looks can be achieved. I recommend that you experiment with each of them and discover other ways that you can alter the shapes and looks of motifs.


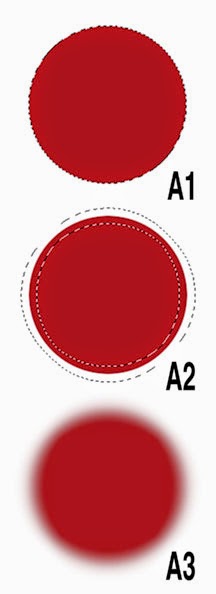
• Modify Selection Border Command
Use the modify selection border command plus the Gaussian blur filter to create a color fade around the motif.

1. Use the Magic Wand tool and click on the image to select it. See A1.
2. Pull down the Select window, open the Modify window, and select Border (Select/Modify/Border).
3. Decide on the number of pixels wanted for the border and enter it. Press okay. 100 pixels were used for example A2.
4. Pull down the Filter window, open the Blur window, and select Gaussian Blur.
5. Enter the number of pixels wanted for the blur and enter it. Click on okay. Press the Command key plus D to deselect the image. 50 pixels were used for example A3.


•Modify Selection Expand Command
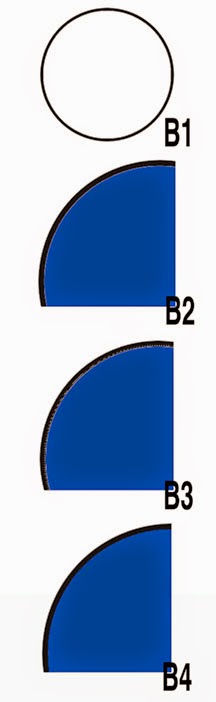
Use the modify selection expand command to remove the white space between the black line and filled blue color on the motif.

1. Example B1 shows the outline circle motif that will be filled with a blue color.
2. Choose the color you wish and use the paint bucket tool to fill the center of the motif. Note: An unwanted one pixel space between the black outline and blue circle occurs. See B2.
3. To remove the white space, open Select/Modify/Expand. Enter 2 pixels in the box. B3 shows the selected area (may not be able to see the selected area on your monitor) that is slightly on top of the black line. Click on okay. B4 shows that the white space between the black and blue is no longer visible.


• Modify Selection Smooth Command
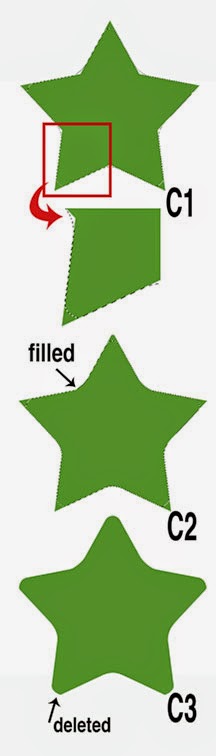
Use the modify selection smooth command plus the brush tool and delete command to alter the shape of the motif.

1. Use the Magic Wand tool and click on the image to select it.
2. Pull down the Select window, open the Modify window, and select Smooth (Select/Modify/Smooth).
3. Decide on the number of pixels wanted to round the corners (points on the star) and enter it. Click on okay. 100 pixels were used for example C1.
4. Fill the inside corners of the star with the same color of the motif by using the brush tool. See C2.
5. Pull down the Select window and select Inverse. Press the delete button on the keyboard. Press the Command key plus D to deselect the image. See C3.
Note: Notice that each rounded point on the star is not uniform. This is probably due to an artifact of the "smooth command" software. The software may do a better job on different shaped motifs.


• Modify Selection Contract Command
Use the modify selection contract command plus the delete command to create an outline of the motif.

1. Use the Magic Wand tool and click on the image to select it. See D1.
2. Pull down the Select window, open the Modify window, and select Contract (Select/Modify/Contract).
3. Decide on the number of pixels wanted for the outline and enter it. Click on okay. 100 pixels were used for example D2.
4. Press the delete button on the keyboard. Press the Command key plus D to deselect the image. See D3.
Note: Notice that some of the "points" inside the star are not sharp. This is probably due to an artifact of the "Contract command" software. The software may do a better job on different shaped motifs.


• Modify Selection Feather Command
Use the modify selection feather command plus the delete command to create a feathered effect on the motif.

1. Use the Magic Wand tool and click on the image to select it. See E1.
2. Pull down the Select window, open the Modify window, and select Feather (Select/Modify/Feather).
3. Decide on the number of pixels wanted for the radius and enter it. 100 pixels were used for example E2. Click on okay.
4. Press the delete button on the keyboard. Press the Command key plus D to deselect the image. See E3.


Your comments are welcome. Click on the comments section (below) to write your comment. Note: Some people have a problem in leaving a comment. The most successful method is to comment as Name/URL (your name and website or blog with a "complete" URL address).

Wednesday, July 17, 2013

Art Licensing: Is Adobe holding Artists Hostage with Creative Cloud?

Last May there were many irate Adobe software users when Adobe announced that they will no longer upgrade their boxed version (software owned by the purchaser) of Creative Suite (CS) software. Upgrades will only be available via their subscription based Creative Cloud (CC) membership. Adobe plans to continue selling CS6 software that can be downloaded from their website but it is already out-of-date because CC updated versions of Photoshop and Illustrator have already been released on CC. For more information about the controversy, read:

• "Adobe's Creative Cloud Move Causes Outcry And Confusion"
• "Adobe's Creative Cloud Sparks Thunderous Revolt"
• "Dislike Adobe's Creative Cloud subscriptions? Tough beans"

Because Adobe Photoshop and Illustrator are considered the standard software used in the art licensing industry, this has a HUGE impact on artists that license their art. The yearly cost of the subscription membership is much greater than periodically upgrading existing software applications. Artists that use the software to only manipulate scanned images of their work in Photoshop can get along fine with older versions. The problem will be later when computer operating systems are updated and possibly no longer recognize the old CS6 version.

But, artists that create art digitally have a decision to make because they depend on robust software. Should they use CS6 applications and no longer get updates that could enhance their art and speed up their work flow OR pay the subscription fee for CC membership? Below are some facts to help them make that decision.

Note: If you plan to subscribe to CC and already own CS software you need to decide soon because Adobe has a reduced first year membership price that ends shortly.

What is Creative Cloud
Adobe Creative Cloud (CC) is a subscription membership plan to use Adobe's creative software. It may be paid month-to-month or individuals can commit to a yearly membership at a savings. There are several levels and different pricing structures available. See the below section on "Creative Cloud United States Membership Price".

CC Misconceptions
There are many misconceptions on how a person uses the software after subscribing to CC. Below are a few but read "5 Myths About Adobe Creative Cloud" to learn more about CC. Also listen to the podcast with Adobe Senior Product Marketing Manager Terry Hemphill and children’s market illustrators Norman Grock and Wilson Williams, Jr. on "Once Upon a Sketch Podcast Episode 5 – Conversation with Adobe about Creative Cloud".

• Myth 1 - Operating the applications (Photoshop, Illustrator etc) is done on the internet and you must be connected to the internet to create files.
Truth: Cloud is really a misnomer because applications are downloaded onto a computer from CC and the computer does not have to be connected to the internet for the individual to create images.

• Myth 2 - File must be stored on the internet.
Truth: Files do not need to be stored on CC. It is an option.

• Myth 3 - You cannot access your files once you leave Creative Cloud.
Truth: Files belong to the individual BUT the individual will not have access to CC applications and cannot edit the files with CC if she/he quits their CC membership. However, files can be edited in owned Creative Suite (CS) applications IF they were saved in a compatible format with the caveat that any CC tools and functions not available in CS will not be useable.

CC Membership Pros
• You do not need to be connected to the internet to use the applications because they are downloaded from the CC website.
• You can use all CC applications if you subscribe to the annual membership plan. The membership subscription plan could be cost efficient if you use many Adobe applications.
• You can use all edge tools and services for web designers and developers.
• You can use all online services for file sharing, collaborating, publishing apps and websites.
• You can store 20GB of files (for most plans) that can be shared with clients and colleagues.
• There is no waiting for software updates.

CC Membership Cons
• You must pay subscription membership fees to use software.
• There is no guarantee that the membership fee will not be raised substantially after the first year.
• You do not own the software so if you stop subscribing to CC you will no longer be able to edit the files unless they were saved in a compatible format for CS versions. Note: A possible problem could be in converting CC files to JPEG formats if you are no longer a CC member. In other words, if the file is saved in a Photoshop CC format can it be converted to another format such as JPEG if you no long have access to Photoshop CC?
• Any images using new features and tools in applications that are updated in CC will require the user to continue using CC so that they can edit the images. That means an individual is forced to continue using CC regardless of membership price.
• You must confirm membership via internet every 30 days for month-to-month membership and every 99 days for annual membership. If you do not confirm, the CC applications on your computer stops working.
• If you need to use the software on more than two computers, you need to subscribe to additional memberships (same policy as for CS applications). The same applications can be put on two Macs, two PCs, or one of each.
• You must purchase separately all Adobe Touch Apps (Photoshop Touch, Kuler for iPhone, Ideas, Behance for iPhone, Creative Portfolio for iPhone).

Creative Cloud United States Membership Price
Annual membership for US individuals are billed monthly for most popular desktop applications. Click here to see what applications is included. Note: The price is locked-in for an annual membership. The member is obligated to paying 50% of the remaining annual fee if she/he decides to quit the subscription before it ends. The price of the subscription for a month-to-month member is not locked in.

To find out if CC is available in other countries, look under Purchasing and availability section in "Adobe Creative Cloud / FAQ".

Annual fees
• new CC member (do not own CS applications); $49.99/mo
• CS upgrade (CS3 - CS5.5 customers) ends 7/31/13; $29.99/mo
• CS upgrade (CS6 customers) ends 8/31/13; $19.99/mo
• Students & teachers (requires institutional affiliation); $29.99/mo
• Single application for non CS customer (limited access to services); $19.99/mo
• Single application for CS3-C6 customers (limited access to services); $9.99/mo

Month-to-month fees
• Single application for non CS customer; $29.99/mo
• Other month-to-month plans are available but you need to contact Adobe to find out the price.

Free 30-day trial membership for all apps (limited access to services)

Click here for more information about membership plans.

What is the Alternative?
If you do not want to be held hostage to Adobe's Creative Cloud subscription plan, you only have the two choices. Continue using Adobe CS6 or older versions of Adobe software OR start using software from other companies. Alternative software may not have all the bells and whistles but they will do the job. On top of that many are free and most are much less expensive than Adobe. Below is a list of articles that discuss alternative software.

• "How to build your own Adobe Creative Suite with cheaper Mac app alternatives"

• "What are good alternatives to adobe software"

• "10 Photoshop Alternatives That Are Totally Free - Gizmodo"

• "10+ Best Free or Open Source Photoshop Alternative Software"

• "Is there an alternative to Illustrator? Here's 5 . . ."

• "10 Best Alternatives to Adobe Illustrator"

If you object to Adobe holding artists hostage and you want to voice your opinion, sign a petition on change.org for "Adobe Systems Incorporated: Eliminate the mandatory "creative cloud" subscription model." ( http://chn.ge/12xLnTE ) Over 36,000 people have sign it. They need 13,000 more signatures!  Thanks Debra Valencia for sharing this link.

Your comments are welcome. Please click on the comments section (below) to write your comment.

Monday, March 11, 2013

Art Licensing: How to Transfer Multiple & Large Hi-Res Files

Often it is not an option to send electronic images to clients on CDs or DVDs via snail-mail (postal delivery) because in the art licensing industry manufacturers need high-resolution (HiRes) files as soon as possible to meet their deadlines. And, if there are many files to send and the files are large, there may be a problem sending them via electronic mail (e-mail) because the recipient's e-mail carrier often limits each e-mail to 25MB or less. Most of the Hi-Res files requested by my clients are 3MB to 9MB. If three or more images are requested, they usually cannot be sent in one e-mail because it will most likely be rejected by the e-mail carrier. And, if a large Hi-Res layered Adobe Photoshop image needs to be sent it may be at least 250MB in size that is impossible to transfer via e-mail. Some manufacturers have ftp (file transfer protocol) sites where an artist can enter a password and upload large files. However, most do not.

So how can artists transfer multiple and large HiRes files to manufactures? This is where internet file sharing host services make it possible such as dropbox, Goggle Drive, YouSendIt, MediaFire, RapidShare, ShareFile, etc. Most of them are free with limited options. Additional options are available at a cost.

One of the most popular file sharing service used by artists is YouSendIt.com. The free version allows a person to store up to 5GB of files on the YouSendIt site with a maximum of 100MB per file size. The files can be customized for the length of time they are stored on the site. YouSendIt also tracks when files are download and by whom which makes it convenient in tracking that the client received the file(s). The downside to the free version is that only a link to one file at a time can be sent to a recipient via a YouSendIt e-mail. But, for $9.99 per month, a person can store up to 25GB and send links to multiple files with a maximum of 1GB file size. Note: I purchased the service so that I could send links of multiple large Hi-Res files to all my clients (manufactuers, publication editors, agent) with one e-mail. With the limitation of the free version, I found it VERY cumbersome and unprofessional to send multiple e-mails when clients requested numerous images! All my clients find YouSendIt sent links straightforward and easy to download files. I usually limit the storage time of each file on the site to about ten days for security reasons. That way, not many images are available if the site is hacked (unauthorized access was gained to the site).

To find out about other file sharing services, read "10 file-sharing options: Dropbox, Goggle Drive and more" by Serdar Yepulalp on the Computer World website. He described and listed the options of MediaFire, RapidShare, ShareFire, YouSendIt, Box, Dropbox, Google Drive, Minus, SkyDrive, and SugarSync.

Please share your experience with any file sharing services. Click on the comments section (below) to write your comment.

Monday, February 25, 2013

Photoshop Tip: Creating an Animated .gif File Slideshow

A good way to capture attention is to place a short slideshow of your best work on your website, blog, iPad, smart phone or even e-mails. A slide show is eye-catching and a good marketing tool as long as it is short and used strategically (i.e. not used too often on a site or placed where it distracts from the main objective). Customized slide shows can be created for you by service companies such as myesig.com or you can create your own with Adobe Photoshop by using the animation tool and saving it as a .gif file. The advantages in having a company created slide show is that their services include faster download of the slideshow, linked buttons and button statistics.

Note: A draw back to animated gif file slideshows is that not all operating systems support it. For instance, an animated gif file slide show on a Mac with OS snow leopard does not work in MacMail (email browser) and neither does Windows OS 7 in the Windows Picture viewer on a PC. Only the first frame of the slideshow is displayed. Thus, it is best to start the slideshow with the image you want everyone to see just in case the viewer cannot see the rest of the images.

A file with many layers (images) can be large and take a long time to download. So a slideshow should not have too many images. Also, you should save the files as low resolution (72 dpi) and in a small dimension. But, the size of the images depends on what device you are using it on. For instance, for a website the size of each image probably should be at least 3 or 4 inches at 72 dpi so that it can make an impact but for an email 1 to 2 inches may be sufficient because a smaller file for a faster download time is very important.

The following is the Photoshop steps used to create the animated .gif file slideshow shown at the top of this article. I used square images but any dimension can be used.


A. Format the images
Three square images were chosen for my slideshow. Since this is for a blog, I decided to format them for a 3 by 3 inch images at a low resolution of 72 dpi.
1. Open a new Photoshop 3 by 3.125 inch file at 72 dpi. The extra 0.125 inch will be used to insert copyright and identification text at the bottom of each image.
2. Drag each of the three image files into the Photoshop file. The size of the original image does not matter because it will be resized to fit the file size IF in Photoshop general preferences the "Resize Image During Place" box has been selected.
3. There are now four layers; background, and three art images. Delete the background layer.
4. Move the first image to the top.
5. Use the bucket tool to fill the space at the bottom of the image with white.
6. Type the image identification information and copyright on the white rectangle. I used Helvetica 11 pt font.
7. Merge the text onto the image layer (Command E).
8. Repeat steps 4 - 7 for each of the other images. There are now three image layers.

B. Animate the slideshow
1. Go to Window/Timeline (in Photoshop CS6 version) to open the Timeline menu. Or if you have an earlier version of Photoshop go to Window/Animation.
2. Click on "Create Frame Animation" button in the Timeline window. One image is now shown in the window.
3. In the upper right corner button of the Timeline window, select "Make Frames from Layers." All three images are now shown. The position of the images displayed can be adjusted by dragging the images.
4. The animation can loop forever or the number of times you wish. Select the Once button at the bottom of the timeline window to select what you want. I chose forever for my slideshow.
5. Set the length of time each image is shown, by clicking the drop down sec button below each image. All images will be set to the same time if you select each image in the Timeline window by holding down the shift key and then selecting the time. I used 2 seconds per image for my slideshow.
6. Test out the slideshow by clicking on the right arrow at the bottom of the Timeline window.

C. Save the slideshow
1. Save the file by selecting File/Save for Web.
2. Select GIF and press Save.
3. Name the file and press Save. The size of my animated gif. slideshow is 106 KB.

Your comments are welcome. Please click on the comments section (below) to write your comment.

Friday, December 28, 2012

Photoshop Tip: Enhance Images with the Gradient Tool

The gradient tool is very useful in creating backgrounds and patterns and also enhancing text and images. It creates a gradual blend between multiple colors. Persons can choose from preset gradient fills or create their own. Each gradient fill contains settings that control the opacity and transparency of the fill at different locations on the gradient. A noise gradient is also available. It contains randomly distributed colors within the range of colors that a person specifies.

If you do not know how to use gradients, how to adjust the settings, or how to create custom gradients, the following videos are worthwhile watching.

How to use and adjust gradients
• "Adobe Photoshop Tips and Tricks With The Gradient Tool"
Learn how to set your own colors and add some great colors with the noise randomize button.

• "Exploring Gradients 1 - Photoshop Tutorial"
Learn about options bar, the kinds of gradients that are available, how to click and drag to get the gradient exactly where you want it, and what the checkboxes do.

• "Exploring Gradients 2 - Photoshop Tutorial"
Editing a solid gradient; find out how to change the colors and transparency, how to move the midpoints, how to pick up colors from anywhere on your desktop, and how to put the Foreground and Background colors into a gradient so it will change as you change your colors.

• "Exploring Gradients 3 - Photoshop Tutorial"
Learn all about noise gradients.

• "Exploring Gradients 4 - Photoshop Tutorial"
Examples on using gradients - making a vignette using a radial gradient on a mask and showing several center points with radial gradients.

The following videos give useful ideas on how to use gradients for text, and special effects on images using the mask tool and gradient maps.

Gradient Examples
• "Photoshop Top 40 #21 - The Gradient Tool"
Using the gradient tool you can you paint a soft transition from black to white and soften the transition from one image to another. The gradient tool fades, swipes, and more.

• "Photoshop Tools: The Gradient Tool for Graphics"
Shows a couple examples of different ways that the gradient tool creates more interesting graphics.

• "Creating Collages with Adobe Photoshop CS3"
Shows how to create collages (images on top of one another) using layers, layer masks and the gradient tool.

• "Gradient Text Photoshop Tutorial"
Shows using gradients in text.

• "Photoshop Gradient Tool Techniques"
Shows how the gradient tool can be used to create the same effect as a polarize filter on a camera has on a washed out sky.

• "Photoshop: Using the Gradient Map adjustments | lynda.com tutorial:"
Shows how to tint images with the gradient map.

• "Gradient Maps Photoshop Tutorial - HD"
Discusses how to use the gradient map and photographic toning adjustments to add tinting effects to an image.

Hint: Using the gradient tool for backgrounds is okay but to give the background some pizzazz it needs to be used with a textured or patterned layer. The background in the image (at the top of the article) was created with two gradient layers that were overlaid with a pattern. For information on creating textures, read "Photoshop Tip : Creating Textured Backgrounds with Filters." And, read "Photoshop Tutorial: Using Pattern Overlay, Pattern Stamp, & Pattern Maker to Create Backgrounds" for information on using patterns.

Your comments are welcome. Please click on the comments section (below) to write your comment.

Sunday, September 23, 2012

Adobe Acrobat / Reader Tip: How to Create a Certified Digital Signature

Electronic signatures on documents are legal in most countries including the US. And if the signature is certified and the document unchanged after it was signed, the more likely it will be trusted to be authentic. Adobe Acrobat and Reader are the predominate software that allows a person to sign a .pdf file with a certified digital signature. Read "Art Licensing: Using Certified Digital Signatures in Contracts" for more information on certified digital signatures, certified certificates, what requirements makes digital signatures legal, and why digital signatures created in Adobe Acrobat and Reader conform to legal requirements and gives assurance that the documents are authentic.

There are three steps to create your own personal certified digital signature in Acrobat and Reader* (version 8 and later).
1. Either scan a handwritten signature into the computer or write the signature with a digital tablet/pen in graphic software.
2. Create a digital ID with a password. The password will be used each time a document is signed.
3. Configure how the signature appears on the document by opening the signature appearance window to select the graphic and information you wish to appear with the signature. Below are instructions on how to do these steps in version 10 of Acrobat and Reader.

These instructions may be long and seem complicated but they are really easy. Once the signatures, digital ID and look of the signature (appearance) are created, certified digital signatures can then be applied to .pdf files with a click and drag of the mouse.

* Adobe Reader .pdf file cannot be signed with a digital signature unless the Usage Rights were enabled when the .pdf file was saved by Adobe Acrobat. Read the enabling Usage Rights for Adobe Reader with Adobe Acrobat second at the bottom of this article.

Creating Signature Graphic File(s)
A signature can be handwritten, scanned as a .jpg file, and placed into graphic software such as Adobe Photoshop or it can be created with a digital tablet and stylus while in graphic software. The signature then needs to be saved as a .pdf file.

Or the signature file can include a logo or a photo of the owner of the signature. The photo adds more authenticity to the signature. It can be created in Photoshop and saved as a .pdf file. The example at the top of this article shows this type of certified digital signature. Note: An actual photo of a person and signature should be used but for illustration purposes I used a drawing of a person and a font to type the signature.

Creating a Digital ID in Acrobat
1. Open a .pdf file in Acrobat and select "Tools" at right top of Acrobat panel to open the tool bar.
2. Select "Sign & Certify" and then "More Sign & Certify"
3. Select "Security Settings" in the pull down menu to open the "Digital IDs" window. See example A.
4. Click on "Add ID" at top of window to open the "Add Digital ID" window, click on "A new digital ID I want to create now". See example B. Then click on "Next >" button.
5. In the new window enter the name of the signee, organizational Unit (optional; example = artist), Organizational Name (optional; example = Fun Art), Email Address. Note: The key Algorithm (code that secures the data) default is 1024-bit RSA but Adobe literature states that 2048-bit RSA is more secure. See example C. Then click on "Next >".
6. In the new window enter the file location on your computer where you want the digital ID filed, and assign a password to protect the digital ID data. A password with a combination of numbers and lower/upper case letters give a better rating. The password will be required every time a document in Adobe Acrobat is signed with a digital signature. See example D.
7. Click on "Finish" to go back to the Security Settings window. The digital ID is now listed in the window. Click on "close". Note: More than one digital ID can be created for different uses or persons.

Creating a Digital ID in Reader
Open a .pdf file in Reader and choose Edit > Protection > Security Settings to open the "Digital IDs" window. Then follow the same steps used in Acrobat (#4 - 7) for creating a digital ID.

Configure the appearance of the digital signature in Acrobat or Reader
1. Open a .pdf file in either Acrobat or Reader. Select "Preferences" under the word Acrobat (Command + Comma) to open the preferences window.
2. In the Preference window select "Security" to open the "Digital Signatures" window.
3. Check the box for "Verify signatures when the document is opened" and for "View documents in preview document mode when signing". See Example E.
4. Select the "Advanced Preferences" in the upper right of the window. In the "Digital Signatures Advanced Preferences" window select "Creation."
5. Check "Include signature's revocation status when signing", "Show reasons when signing", and "Show location and contact information when signing." See example F. Then press "OK" to go back to the Preferences window.
6. On the right side of the "Appearance" box press the "New..." button to open the "Configure Signature Appearance" window.
7. Name the appearance in the "Title" box.
8. Click on "Imported graphic" button in the "Configure Graphic" section and import the .pdf Graphic of the signature from your computer.
9. Click on the text items in the "Configure Text" section that you wish to appear in the digital signature. See example G. Click on OK to go back to the "Preferences" window.

You can create multiple appearances that can be used for different purposes. Do steps 6 through 9 (above) to create another appearance. You have the option to choose which appearance you wish to use when signing a document. See example H.  Example I shows the two newly created signature Appearance names.

Applying Digital Signatures to documents in Acrobat and Reader
A digital ID can be created in Adobe Reader but as mentioned above a person cannot apply a digital signature to the document in Reader UNLESS the .pdf file Usage Rights was saved by Adobe Acrobat. A person can tell if the usage rights was saved if the Extended pull down menu is listed at the top right of the Reader window (next to Comment). To learn how to enable Usage Rights for Reader, see the section below "Enabling Usage Rights for Adobe Reader with Adobe Acrobat".

To sign the document in Adobe Acrobat with a digital signature
1. open Tools > Sign & Certify.
2. Click on the Sign Document. Then click and drag a rectangle box on the area in the document that you want the digital signature to appear. If a message appears that says "This document contains rich content that . . . " click on Continue. A grayed out area appears on the document.
3. Click on "Sign Document" at the top of the window. After a pause the "Sign Document" window appears.
4. Select a "Digital ID" in the "Sign As" space, enter the password for the Digital ID, select the appearance you want, and enter any additional signature information. Press Sign and a "Save As" dialog box appears. Change the name and press "Save" OR simply press "Save" to save the file with the Digital Signature. If another signature is needed and the person only has Adobe Reader the file should also be saved with Usage Rights. See the section below on "Enabling Usage Rights for Adobe Reader with Adobe Acobat".

To sign the document in Adobe Reader with a digital signature, the file must have the word Extended (next to Comment) at the top of the window. If Extended is missing, the file does not have Usage Rights and a digital signature cannot be applied to the document.
1. Click on Extended to open the menu and then click on Sign Document.
2. Follow the on-screen instructions to create and place the signature on the document.
3. Then follow step 4 for signing documents in Acrobat. When the file was saved after signing the document, the Usage Rights were also saved and Extended is still enabled. Thus, additional persons can sign the document in Reader. Caution: If you save the file by selecting File > Save As > PDF the Usage Rights will be lost and no more signatures will be allowed.

Enabling Usage Rights for Adobe Reader with Adobe Acrobat
In Adobe Acrobat the Usage Rights can be enabled by selecting File > Save As > Reader Extended PDF > Enable Additional Features. When the file is opened in Reader the Extended pull down menu is enabled and a digital signature can be applied to the document.

Summary
To apply a certified digital signature to a .pdf file a person must first create a digital signature, then a Digital ID, and finally an appearance on what information is included in the digital signature. The originator of the document or the first person that applies a digital signature must own Adobe Acrobat. That person must save the file with Usage Rights enabled if other persons that need to sign the document only have Adobe Reader.

Your comments are welcome. Please click on the comments section (below) to write your comment.

Wednesday, September 12, 2012

Photoshop Tips: Understanding Brush Dynamics (settings)

If an artist does not create paintings digitally it is still useful for her/him to understand how the brush dynamics change the look and use of the different brush tip shapes in Photoshop. Brushes are very useful for adding signatures to paintings, creating textures, creating wash backgrounds, and touching up scanned images. The eraser tool also uses the brush tip shapes for different erased effects. Hint: Read "Photoshop Tip: How to create customized signature brush."

Custom brushes can be created by altering the settings (shape, scattering, texture, color, noise, etc.) of an existing brush tip shape or creating one from scratch to get the desired effect. Below are links to a comprehensive series of excellent Photoshop video tutorials by Robin Wood describing and showing the different brush dynamics. These videos were created with an older version of Photoshop and the brush panel is somewhat different and some of the dynamics are in different places on the brush panel if you are using CS5 or CS6. However, they operate the same so viewing these videos are worthwhile to learn about the different dynamics and how to alter them for different brush tip effects.

• "Brushes 1 - Photoshop Tutorial"

introduction of brush tip shapes in the brushes panel

• "Brushes 2- Shape Dynamics"

how to vary brush size, angle, and roundness with a jitter or with control

• "Brushes 3 - Scattering - Photoshop Tutorial"
how to adjust the Wacom pen and tablet, and using scattering dynamic in brushes

• "Brushes 4 - Textures - Photoshop Tutorial"

adding textures to a brush

• "Brushes 5 - Dual Brush - Photoshop Tutorial"
learning what the parameters do in a dual brush and seeing it in action

• "Brushes 6 - Color Dynamics - Photoshop Tutorial"

explanation of color dynamics panel in detail

• "Brushes 7 - Other Dynamics - Photoshop Tutorial"
brush opacity and flow demonstration

• "Brushes 8 - Below the Line - Photoshop Tutorial"
demonstration of noise, wet edges, airbrush, smoothing and protect texture

• "Brushes 9 - Making Your Own"
how to make and save custom brushes

Some of the above videos use a pressure sensitive tablet with a stylus such as a Waccom tablet. You do not need to use a tablet to use many of the brushes. But Photoshops new brushes that were introduced in CS5 can create some amazing results when used with a tablet and a special stylus. The brushes can be rotated and held at an angle to apply "paint" digitally just like actual paintbrushes can apply paint to a canvas. To see a demonstration of these brush tip shapes and bristle quality options view "Photoshop overview: Brush tip shapes and bristle qualities | lynda.com"

Your comments are welcome. Please click on the comments section (below) to write your comment.

Tuesday, July 31, 2012

Editorial: Should you OR can you upgrade to Photoshop & Illustrator CS6?

If you are using Photoshop or/and Illustrator to manipulate, enhance, or create your art for licensing, it will soon be imperative to upgrade to the latest version of Adobe CS6 or be left behind. But unfortunately, for some artists upgrading to CS6 will not be a simple or inexpensive process because it also means that they may have to upgrade the operating system (OS) of their computer and possibly purchase a new computer.

For the Macintosh computer, the reason is because Adobe made a huge change in the coding for CS6 and CS6 applications will not operate if the Mac OS is below version 10.6.7 (snow leopard). Adobe decided to take advantage of the changes that Apple made in snow leopard to speed up the performance of applications by using multi-core processing and high amounts of RAM*. Read "Difference between Leopard and Snow Leopard." And continue reading to find out why you should upgrade sooner than later and why upgrading to CS6 could become very expensive.

* RAM is Random Access Memory on the computer that provides space to read and write data by the CPU (central processing unit). If there is not enough RAM on the computer to run all the applications that are open at the same time (including email and internet browser) the computer can bog-down or even hang-up. Note: There are also other kinds of memory on the computer. Cash memory helps speed RAM memory when processing data and virtual memory on the hard drive is used for storing data.   For more information on memory, read "How Computer Memory Works."

Why upgrade NOW:
• Future cost of CS6 applications will be full price instead of the upgrade price unless you upgrade. CS3 or CS4 can only be upgraded to CS6 at the upgrade price until 12/31/12.

• Has some great new features such as:
- (Photoshop and Illustrator) re-engineered the tools so that they interact faster
- (Photoshop) automatically saves files in the background
- (Photoshop) generates geometric pattern fills with scripted patterns
- (Photoshop) better, more and easier to use vector tools
- (Photoshop) more brushes and filters
- (Photoshop) content-aware tools allows better editing of images
- (Illustrator) easy pattern creation
- (Illustrator) better raster image trace engine
- (Illustrator) ability to apply gradients to strokes
- (Illustrator) enhanced color panel

Why you may NOT want to upgrade:
• if your computer is old. A Macintosh needs a multicore intel processor with 64-bit support to operate Adobe CS6 software. A PC needs an Intel Pentium 4 or AMD Athlon 64 processor.

• if you are using an old operating system. If you are using an old operating system, you may not be able to open CS6 applications. A Mac needs OS X v10.6.8 (snow leopard) or greater. A PC needs Microsoft Windows XP with Service Pack 3 or Windows 7 with Service Pack 1.

• if you have insufficient RAM on your computer. Photoshop CS6 only needs 1GB of RAM to operate but Adobe recommends 6GB for optimal operating speed if several CS6 applications are opened at the same time.

• if you are using software that is not compatible with newer operating systems. Or you do not want to spend the money to update software that is not compatible with a newer operating system.

So there are reasons not to upgrade to CS6 especially if you cannot afford to. But eventually you will have to upgrade to the latest version because either Photoshop or/and Illustrator is needed in licensing art.

Make sure that you read the comments!  Artist Phyllis Dobbs has shared some important Photoshop information.

Your comments are welcome. Please click on the comments section (below) to write your comment.

Friday, June 8, 2012

Photoshop Tip: Embellishing Text for Art

Text is often used in designs as backgrounds, as a collage of words, to give inspirational messages, and as headlines on greeting cards, decorative flags, and other products. Artists can get the approximate text look they want by choosing from a variety of fonts. And they can then enhance the text by using Photoshop blending options to tweak and embellish it to give it that extra touch or to make it pop and more visible.

Blending options include drop shadow, inner glow, inner shading, outer glow, bevel and emboss, satin, stroke, gradient overlay, and pattern overlay. They can be accessed by going to Layer / Layer Style on the command bar at the top of the Photoshop window or by clicking on the fx symbol at the bottom of the layers pallet window.

More than one blending option can be used at a time. They are fast to apply so it is easy to create fun, interesting and decorative text. But because it is fast and easy to use blending options, it is also easy to forget that text should be readable and complement the rest of the design; unless the intent is to make the text the central focus.

See the illustration at the top of the article for examples of different blending options. Below is a description on how they were achieved. Note: Many more effects can be created by adjusting the controls in the blending option windows. So experiment with them.

• 1TEXT - Drop Shadow
green color; 100% opacity; 18 px distance

• 2TEXT - Inner Glow
100% opacity; green color; softer technique; center source; 6% choke, 27 px size

• 3TEXT - Inner Glow
100% opacity; green color; softer technique; edge source; 9% choke; 21 px size

• 4TEXT - Inner Shading
100% opacity; green color; 26 px distance

• 5TEXT - Outer Glow
100% opacity; green color; softer technique; 21 px size

• 6TEXT - Bevel and Emboss
pillow emboss; smooth technique; 481% depth; up direction; 24 px size; 16 px soften; normal highlight; 75% opacity; normal shadow; green color; 100% opacity

• 7TEXT - Stroke
8 px size; outside position; normal blend mode; 100% opacity; green color

• 8TEXT - Satin
normal blend; green color; 100% opacity; 41 px distance; 0 size

• 9TEXT- Gradient Overlay
100% opacity; red and green color gradient; linear style; 90 degree angle; 57% scale

•10TEXT - Pattern Overlay
normal blend mode; 100% opacity; custom made pattern; 25% scale

Related article:
"Photoshop Tip: Editing Font Characteristics" - Adjusting the font size, orientation, sharpness, alignment, color, and numerous warps by selecting the text and using the controls in the text options bar.

I welcome any comments. Please click on the comments section (below) to write your comment.

Tuesday, April 10, 2012

Photoshop Tip: Using Blending Modes to Enhance Images and Backgrounds

Photoshop blending modes allows you to non-destructively blend and change the pixels in the images on the layers. You can easily create special effects, change colors and hues on the layers, blend a pattern into an image, add black (or white) logos on the painting that appears to have a transparent background although the background is actually white (or black), add contrast to images, and much more. Not only can you save time by using blending modes but you can create some amazing results to enhance your art.

There are over 20 different blending modes but the most used are Screen, Multiply and Overlay. The blending modes are located on a pull down menu in the upper left corner of the Layers pallet. You can quickly scan through the different blending modes by using keystrokes Option (PC = Alt) & Shift & Plus sign (+).

According to the Photoshop help reference,
• Screen "Looks at each channel's color information and multiplies the inverse of the blend and base colors. The result color is always a lighter color. Screening with black leaves the color unchanged. Screening with white produces white. The effect is similar to projecting multiple photographic slides on top of each other."

• Multiply " Looks at the color information in each channel and multiplies the base color by the blend color. The result color is always a darker color. Multiplying any color with black produces black. Multiplying any color with white leaves the color unchanged. When you're painting with a color other than black or white, successive strokes with a painting tool produce progressively darker colors. The effect is similar to drawing on the image with multiple marking pens."

• Overlay "Multiplies or screens the colors, depending on the base color. Patterns or colors overlay the existing pixels while preserving the highlights and shadows of the base color. The base color is not replaced, but mixed with the blend color to reflect the lightness or darkness of the original color."

Sounds confusing, huh? Well, using blend modes is really quite simple as you will see when viewing the videos listed below.

Video Tutorials Describing Blending Modes

• "Using blending modes for photographers"

• "Photoshop Tutorial: Introduction to Blend Modes"

• "Photoshop Tutorial: Blending Modes"

• "Multiply, Screen & Overlay Blend Modes in Photoshop"

Video Tutorials Showing Blending Mode Examples

• Blending modes introduction and adding contrast to images

" Photoshop Tutorial: Layer Blending Mode Intro"

"Photoshop Tutorial: Overlay Pt. 2 - High Pass"

"Photoshop Tutorial: Overlay Pt. 3 - Contrast"

•Blending images to create a special effect

"Photoshop CS5 #10: Layer blending options (Flame Circle)"

• Using Blending modes to placing logos on art

"Photoshop Tutorial - Using Blend Modes"

Comments are welcomed. Enter them in the below comment section.

Tuesday, February 14, 2012

Photoshop Version CS6 to be Released First Half of 2012

It has been over 18 months since the release of Photoshop Creative Suite version 5 (CS5) and the new version CS6 is expected to be released the first half of 2012. Based on previous version release dates, speculation is that it will be in May. Read "When Will Adobe Creative Suite 6 be Out, Including Photoshop CS6?" for more information. Adobe developers have already released the prerelease (beta) version of CS6 to those interested in testing it and some videos showing CS6 new features are already posted on the internet. Ps CS6 will include a new user interface (interaction of the software and the computer) that improves the rendering of some effects and has a different looking window. Tools and features are enhanced such as the camera raw processing, 3D effects, addition of three image blurring effects, greatly improved vector pen tool, a new color replacement brush, and will include an auto file saving feature.

New Adobe Software Updating Policy
Because updating software is expensive, many artists do not update every time a new version is released. It normally is not a problem with Adobe software because in the past Adobe has allowed discounted software upgrades for users of three previous versions of the software. But Adobe's policy has changed starting with CS6 and now they only discount an upgrade of the previous main version. However, users owning CS3 and CS4 will be allowed to purchase CS6 at the upgrade price until December 31, 2012. An alternative way in using many of Adobe software packages is to sign up for Adobe Creative Cloud. Creative Cloud is a membership service (starting at $49.99/month) that allows the member access to all the CS software, Adobe Apps, services, and new products as soon as they are released. Unfortuately very few artists can afford it.

Below are some videos of a sneak peak at the new Photoshop CS6. Note: The sound in a few of the videos is not very good or the presenter is hard to understand.

• Camera Raw Processing tool: "Sneak Peak #1"

• Liquify Tool and Background Save: "Sneak Peak #2"

• Vector pen improvements: dash and dotted vector lines along a shape "Photoshop CS6 sneak peek video #3"

• Vector pen tool: "Photoshop CS6 New Features - Pentool / Stroke /Layer Palette Filters"

• Color Replacement brush: "Photoshop cs6 - new features - color replacement brush"

• New blurring filters: "Photoshop CS6 Review ( NEW 2012)"

• Magically move and remove images in painting: "Photoshop CS6 Content-Aware Sneak Peak"

Comments are welcomed. Enter them in the below comment section.