


 You can create amazing three dimensional (3D) products in Adobe Illustrator and then place your art onto the surface(s) to make outstanding mock-ups. In Illustrator all kinds of 3D shapes can be created such as bowls, cups, plates, and vases. For more information read "Adobe Illustrator - Creating 3D Product Mockups."
I found that creating 3D objects and placing art on them is easy to do once you know how but explaining it in a tutorial can be quite long. Thus, I am going to do a series of tutorials. This first tutorial will show you how to create simple shapes and convert them into 3D objects. Later tutorials will show you how to place (map) your art onto the surface(s) of the objects and how to create more complex objects. Simple 3D objects can be used for all kinds and shapes such as decorated boxes, gift bags, stationery products (books, notepads), and candles.
View three videos by two different people to help you understand the method in creating 3D objects and make it easier to follow the steps in my tutorial. In fact, watching the videos may be all that you need. But I decided to also include a written step-by-step tutorial for those of you that learn easier that way.
1. Part one video on creating 3D objects.
2. Part two video on creating 3D objects.
3. A video that is a little more detailed in creating 3D objects.
I assume that you know how to use the basic tools and commands in Adobe Illustrator. Use the help package in Illustrator if you don't know how to access some of the tools that I mention. The following shows you how to create a six sided box.
1. Open a new document in Adobe Illustrator. Then open the layer window (Mac = F7 key) and choose a new layer.
2. Choose a fill color in the color menu at the bottom of the tool bar but don't choose an outline color.
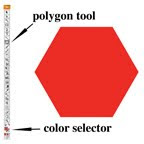
3. Choose the polygon tool on the tool bar. It is in the same pull down menu as the Rectangle Tool (Mac & Windows = M). Note: the default polygon is six sided but you can alter the number of sides by double clicking in the window when the polygon tool is selected. A menu pops up where you can choose the size and number of sides of a polygon.
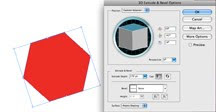
4. To create an object with the polygon shape, click on the shape to select it. Then go to Effect on the Menu bar at the top of the monitor, choose 3D, and then Extrude & Bevel. The 3D Extrude & Bevel Options window pops up for editing the object as viewed at the left.
5. Select the preview button in the window so that you can see the shape as a 3D object.
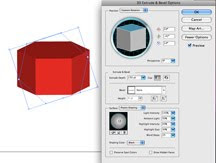
6. You can rotate the object by moving the box in the 3D Extrude & Bevel Options window. To increase or decrease the depth of the object, change the Extrude Depth value. Choose a closed cap to cover the top and bottom of the object or an open cap to show a tube of the object.
7. Click on more options (right side of window) so that you can access the lighting tools. Move the square on the ball to move the lighting source on the object. You can also adjust the intensity, ambient light, intensity, size and blending of the light. More lighting sources can also be added by clicking on the middle icon at the bottom of the lighting window. In my example, I used one lighting source, an extrude depth of 150 pts with no bevel, and a closed cap.
8. When finished, click okay to exit the option window. If you want to later change some of parameters in the 3D Extrude & Bevel Options window, simply select the object and go to the appearance menu (Mac = shift + F6) and select 3D Extrude & Bevel for that window to open. Note: The object can be exported as a jpg or other file formats so that they can be used in Photoshop. However, you may want to wait until your art is placed on the object before exporting the file. Read "Illustrator Tip: Mockups (Step 2) - Placing Art onto 3D Objects" to learn how to create 3D objects
The examples shown in the picture at the top of this article are a variety of objects that can be created in Illustrator by using the polygon, ellipse (oval shape), rounded rectangle, star tools and converting them into objects with the 3D effect. A bevel was applied to the edge of the pink oval while in the 3D Extrude & Bevel options window. To make the objects look like products, I put a line around the green box so that the object looks like it has a lid; put a clip art icon on the pink oval; drew three ovals to simulate pencil holders on top of the blue box and put a pencil clip art icon into one hole; and placed a verticle line on top of the yellow star to simulate a candle wick.
Very interesting! How do you change the size of the box? I have a red polygon with handles on top of my box how do I get rid of that?
ReplyDeleteYou can change the size of the box in Illustrator by first selecting the box with the arrow at the top of the tool bar. Then select the Scale tool (Mac & Windows = S) and drag one of the corner handles.
ReplyDeleteSo that the handles no longer show, select the arrow tool at the top of the tool bar and then click outside the polygon.
Thank you for sharing your skills and know how on this subject. I have been using illustrator for years and always wondered how to use the 3d aspect of illustrator. You have inspired me to look at new ways of implementing this found knowledge.
ReplyDelete