


 In this tutorial, I will show how to place art onto 3D objects that have been created in Adobe Illustrator. If you do not know how to create 3D objects, read "Illustrator Tip: Mockups (Step 1) - Creating Simple 3D Objects" to learn how to create them. Warning: Product mock-ups can look realistic when art is placed on 3D objects. If they are too realistic looking, mock-ups may look like actual products and manufacturers may think that the art on them have already been licensed. To avoid confusion, I recommend that you use signage stating that the art is available for licensing when using realistic looking mock-ups in marketing materials.
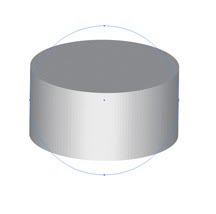 1. Open an Illustrator file of an already created 3D object. This tutorial shows an example of a 3D round shaped object (for a box/tin mock-up) for art to be placed (mapped) onto the top and side. I used the ellipse tool in Illustrator and applied the 3D effect to create the object at the left.
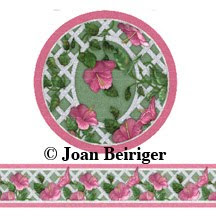
2. In this tutorial, I will use my hibiscus floral art at high resolution (300 dpi) and created in a round shape for the top of the object and in a border for the side.
3. Make a new layer and either drag the round art from an opened Adobe Photoshop file, an Adobe Illustrator file, or use the place command in Illustrator to put the art on the layer. Do the same for the border art. Note: The border art should be long enough to go at least half way around the circumference of the object. When you rotate the 3D object, you want the art to "appear" to cover the entire circumference. I used a 1-1/2 by 18 inches border for this tutorial and it was too long.
4 The art has to be a symbol in Illustrator to place the art onto the object. To make art a symbol select one of the art pieces, open the Symbols Panel (Mac = shift + command + F11; Windows = shift + Cntl + F11), click the New Symbol button. Name the symbol and select the type of symbol as graphic. Press okay and the art will appear in the Symbols Panel. Do the same for the other piece of art.
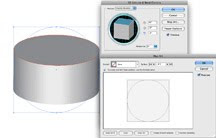
5. Go to the layer that has the object on it and select the object. In the Appearance window (shift + F6), double click 3D extrude and bevel to open the window. Click on Preview so that the object looks 3D (if it does not) and click on Map Art. The Map Art window opens.
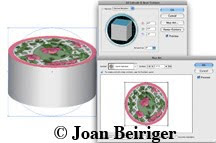
6. In the Map Art window, make sure the top surface is selected in the Surface slider bar. Click Preview and select the round art from the Symbol pull down. Click on the "Scale to fit" button at the bottom of the window.
7. Select the side of the object from the Surface slider bar and then select the border art from the Symbol pull down. Move the art and adjust the size so that it fills the surface. Click on Shade Artwork and then click Ok to exit the Map Art window.
8. In the 3D Extrude & Bevel Options window you may wish to adjust the rotation of the artwork with the custom rotation box. Also you may need to alter the surface shading. When I did the example, I found that the top of the object was too dark so I moved the light source to the top and then added a second light source to shine on the front side of the object with the Surface ball. When finished, click Ok to exit the 3D Extrude & Bevel Options window.
9. Use the pen tool to make a curved line on the mock-up to simulate the division between the lid and base of the box.

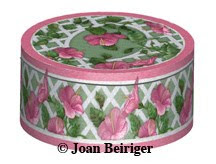
Voila! You now have a mock-up that can be exported as a jpg or another file format so that it can be used in Photoshop for use in creating marketing materials.
Copyright © 2009 Joan Beiriger
oh wow Joan!!! wonderful work....I love these tutorials....you are amazing....
ReplyDeleteI need to learn illustrator now! These look great.
ReplyDeleteI thought I knew everything I needed to know about Illustrator, but there is always more to learn. I look forward to trying this. Thank you!
ReplyDeleteJoan, You are a resource Queen! Thank you so much for sharing your knowledge!
ReplyDeleteWith much appreciation,
Sue Duda (Batiks)and "Wannabe Licensor"