Joan Website | Joan Bio | Joan Licensing Info | Joan Contact Info | Blog Main Page

Art Licensing by artist Joan Beiriger: I'm happy to share art licensing info but please
give me credit and link to my blog when using it on your site. Thanks.

Showing posts with label Art Collections / Mockups. Show all posts

Monday, September 5, 2016

Art Licensing Editorial: Do artists need to create collections?

In the art licensing industry, the most heard answer to questions asked is "it depends". And that is also the answer to the question on whether artists need to create art collections. A collection has many meanings and the following discusses the reason why some types of collections should be created while others may not be needed.

• What is a collection?
A collection can be images that are organized in various ways, or complimentary images created for a specific product, or complementary images and associated designs created for use on multiple products. All these type of collections are useful when submitting to manufacturer art directors (ADs) for licensing consideration and for placing on websites so that ADs can easily find the art they are interested it.

#A - images organized by themes etc.
The advantage in organizing art into collections of themes, seasons, holidays, or occasions is that it is easier for ADs to find art they are interested in licensing and thus the more often they will visit the artist/agent website. Also ADs request art for particular seasons, holidays, and themes. So if the art is already organized into those collections it is easier for the artist to find and submit the art.

The following are possible ways to organize art into collections.
1. Themes - coastal, beaches, nautical; patriotic; birds, birdhouses; butterflies and insects; flowers and gardens; food and wine; inspirational sayings; Lodge
2. Seasons - fall, winter, spring, summer
3. Holidays - Halloween, Thanksgiving, Christmas, Hanukkah, New Years, Valentine's Day, Mardi Gras, St. Patrick's Day, Easter, Mother's Day, Father's Day, Fourth of July
4. Occasions - anniversary, baby birth/shower, back to school, birthday, graduation, wedding

#B - images organized by product type
Some artists organize their art on their website into collections by the type of product that it was created for. For example, the product collections could be greeting cards, gift bags and wrap, decorative flags, fabrics, and tableware.

#C - images formatted various ways
A collection can be one main image that is formatted various ways such as vertical, horizontal, square, and round. Formatting an image different ways takes time but it could increase the likelihood in being licensed. For instance, the greeting card industry produces cards that are vertical, horizontal and sometimes square and round although vertical images significantly out number horizontal images. And, many decorative flag companies sell doormats and mailbox wraps besides vertical flags so they need both vertical and horizontal images. By submitting various formatted art to card companies may mean getting a deal or not. For instance, if the image was submitted only as a vertical format and the AD decided that the image would look better as horizontal then it may not be licensed. And, by submitting images in both formats to flag companies, additional products (mat, mailbox wrap) have a better chance in being licensed instead of only a flag.

Artists typically create art that is vertical since it is the most used format for products. It is true that companies sometimes ask for changes when they are considering licensing an image. But not all companies have the time to wait for images to be reformatted and instead they license art that has already been formatted numerous ways. Also, if the art is already formatted it is ready to go when artists wish to submit art for coasters, plates, etc. (square and round), OR placemats, serving trays, cutting mats, rugs, etc. (horizontal). Thus, having art formatted several ways can be a time saver in the long run and also increase the possibility in licensing the art.

#D - series of complimentary images for a product
This type of collection is two or more images that compliment each other. It is created for one or more specific type of products such as boxed greeting cards, calendars, fabric for the quilting industry, dinnerware, coaster sets, paper party ware, wall décor, gift bags, etc. Creating this type of collection is time consuming and since it is created for a specific type of product(s) it may not be usable to be licensed for other products.

#E - series of images with complimentary images for use on multiple products
When art collections are discussed in the art licensing industry, this is the type of collection that is often implied. It is a series of images including patterns, icons and borders that compliment the images for use on multiple products. Some successful licensed artists recommend that the collection consist of 1. at least four central images; 2. one rectangular, circular, oval, and square frame; 3. at least three borders with different widths; 4. at least several repeating patterns; 5. several backgrounds; 6. at least six or more supplemental icons, 7. text if it is appropriate. The intention on creating this type of collection is that most of the art is already finished before submitting to ADs so the art is ready for multiple products with minor editing needed. And, the art has a better chance in being licensed because the AD can choose from a selection of looks instead of only one.

The drawback in creating this type of art collection is that it is VERY time consuming resulting in artists not being able to create as many different images and have less art to submit for licensing consideration. Also, not all of the recommended components in the collection as listed above can be used on all products. It is a waste of time in creating them if they will not be used. Thus, I recommend that if you want to do this type of collection you create a modified version of it depending on the kind of products the collection are intended for.

• Are collections necessary?
As discussed in #A and #B, it is very useful to organize art into collections. Thus, I recommend that art be organized into at least #A collection.

To increase the opportunity in licensing art for more products, it is probably a good idea to create collections as discussed in #C unless there is no need to format art in various ways. For instance, surface designs are created as repeating patterns for fabrics, scrapbooking and other paper products. There are few opportunities to license repeating pattern designs for products that require formats other than square and maybe vertical so it is not necessary to format the designs as round or horizontal.

Many artists think that all the art they create will be suitable to be licensed for ANY kind of product. Unfortunately that may not be true. Art that is licensable depends on whether it incorporates the current trends, themes and art styles wanted by consumers. Not every product or even each manufacturer in the same product industry uses the same specifications so the art may be only licensable for one, a few, or many types of products. For instance, intricate and collage styled art that was created for jigsaw puzzles (i.e. a bunch of children playing in the snow) would not be licensable for many other products such as decorative flags, tableware, shower curtains and bathroom accessories. Therefore, there is no reason to create a collection of art as described in #E if the art is not licensable for a wide range of products.

However, collections are necessary if the artist wishes to license their art to manufactures that sell products as collections that are listed in collection #D.

• Conclusion
As mentioned in this article, it depends on whether artists should create collections of their art. Some should be created such as #A while others like #E may not be needed; at leased for all art. Creating collections, especially for #E, is very time consuming and if the art is not suitable for a wide variety of products it is a waste of time creating them.

Some artists intentionally begin their licensing career by creating art for only one product industry such as greeting cards, or fabrics. Others may discover by accident that their art tends to be more licensable for one industry than others. So there is no need to create collections #D or #E. However, once they are successful in licensing their art for the one product and decide to branch out into other industries, it may be time to create collections for art that is suitable for a variety of products.

Your comments are welcome. Click on the comments section (below) to write your comment. Note: Some people have a problem in leaving a comment. The most successful method is to comment as Name/URL (your name and website or blog with a "complete" URL address. For example: http://www.joanbeiriger.com/

Wednesday, December 29, 2010

Product Mock-up Templates: Creating art for templates & comparison of template packages

Manufacturers can not always visualize how art will look on their products so creating digital product mock-ups and placing your art on them is a good way to market your art. You can create your own mock-up templates or purchase them. Read the articles in "Art Collections / Mockups" section of my blog to see examples of mock-ups and Photoshop/Illustrator tips on creating your own templates.

There is no right or wrong way to represent product shapes. They can be simple sketches of the products or very realistic and three dimensional. Any kind will do the job in showing the manufacturer how the art will look on products and it is up to each artist to choose the style they like. For instance, if your art is characters or a whimsical style, you may wish to use sketched product shapes to compliment your art. Or, if you paint fine art you may choose realistic looking product shapes. The only thing I caution you to do is to make sure that you label your marketing material that the art is available for licensing when showing realistic product mock-ups of your art. You do not want the manufacturer to think that your art is already licensed to a competitor.

Template Packages
If you do not want to create your own templates, there are three different template packages that you can purchase to create product mock-ups; Tara Reed's "Product Mock-Up Magic," All Art Licensing's "PCLS Collection and Presentations Package with 107 Product Templates!," and Phyllis Dobb's "Create Product Mockups." Below is a chart comparing the different packages.


Creating Art for Mock-ups
It is tempting to slap any piece of art on any product template, send it off to manufacturers, and expect licensing deals to pour in. However, not every work of art is suitable for every product so you need to choose only the ones that work for each theme. For instance, flower art works for most products but a party theme is unlikely to work for bath products or bedroom linens. There just is not enough of a market for brightly colored balloons on sheets or shower curtains. :) Read art licensing agent Jim Marcotte's article "Product Design" for a discussion about this.

Also, it is imperative to create interesting product mock-ups with your art in order to get licensing deals. Do not put exactly the same piece of art on every mock-up shape in the collection! As an art director commented in one of my articles, "A true cohesive collection consists of compelling coordinating designs, interesting crops, textures, mix and match print /pattern. The same motif across all SKU's (i.e. product shapes in the collection) is dull and not very exciting." To see examples of product mock-ups, read "The Dynamic Duo #1 - Examples of Art Collections & Mockups" and "The Dynamic Duo #2 - Examples of Art Collections & Mockups."

I welcome any comments. Please write them in the comment section below.

Saturday, September 18, 2010

Creating Repeat Patterns with Photoshop, Illustrator and Artlandia Plug-in Software

Artists that hope to license their work to the giftwrap, scrapbook, wallpaper, and fabric industries need to create repeat patterns to enhance their art collections. But producing ONLY basic and simple repeat patterns is no longer adequate. Manufacturers expect to see a variation of basic, half-drop, tossed and much more to make a collection more interesting.  Below is information on how to create them.

In the past, surface designers painted repeat patterns by hand but more and more are now using Adobe Illustrator. Vector software such as Illustrator allows the artist to easily alter colors, icon shapes and also enlarge icons without losing resolution. Raster software such as Adobe Photoshop is often used by artists that scan paintings into the computer and isolate icons for use in patterns. Read "What is the Difference between Photoshop and Illustrator?" to learn about raster and vector images.

Below are links to video, written instruction, and e-book tutorials on how to create various patterns in Photoshop and Illustrator. Also below is a description of Artlandia plug-in software for Photoshop and Illustrator that AUTOMATICALLY creates all kinds of patterns.

Tutorials on Creating Various Repeat Patterns in Photoshop and Illustrator
Some of the following tutorials use Photoshop offset, clone tool and layer mask to simplify the repeat process when creating patterns. It may seem a little complicated at first. But once the concept is understood, creating various repeats is very simple and fast to do.

video - "Photoshop Tutorial: Creating Patterns/Basic and Basic-Offset Patterns"
Note: The instructions to click in the corner of the image window while the move tool is selected (in order to open the offset controls) may not work for all versions of Photoshop. An alternative method is to open the dialog box by selecting Filter/Other/Offset.

video (3 parts) - "Make a custom repeating pattern in photoshop - part 1," "Make a custom repeating pattern in photoshop - part 2," "Make a custom repeating pattern in photoshop - part 3."

video - using Photoshop & Second Life fashion software - "Make a Half-Drop"

written tutorial - intricate toss pattern with examples in using it on clothing "Classic Illustrator Tutorial: Create Beautiful Repeating Patterns"

written tutorial - "Creating Repeating Patterns in Photoshop Tutorial"

e-book instructions using Photoshop by Tara Reed (two available - $87 for both): "Basic Repeat Borders & Patterns" and "Half Drop Repeat Patterns"
http://www.artlicensinginfo.com/repeat-combo.html

Software that Automatically Creates Patterns
Plug-in software for Illustrator
SymmetryWorks 5 software by Artlandia is a plug-in for Adobe Illustrator. It works best with vector objects (Illustrator created objects) but also supports jpg and other raster file formats. Thus Photoshop raster images can be imported into Illustrator and patterns created with the plug-in. It allows artists to automatically create 17 repeating patterns such as all over, tossed, spot, half-drop, quarter-drop, step, sliding, composite, counterchanged, gradations. The cost is $275 for the full version of SymmetryWorks 5 and $399 for SymmetryWorks LP (version with additional features). Check out the comparison chart for more information. Note: Because the company states that the software works best with vector objects, I suspect that it may be slow when creating raster image patterns.

Plug-in software for Photoshop
SymmetryShop 3 software by Artlandia is a plug-in for Adobe Photoshop. It allows artists to automatically create 17 repeating patterns and supports vector images but is more limited in what can be done than what can be done in SymmetryWorks. Check out the comparison chart for more information. The cost is $341 for the full version.

Note: The cost is $539 to purchase both SymmetryShop 3 and SymmetryWorks 5.

I do not own either software package because I just discovered it when doing research for this article. However, they both look VERY impressive and will make pattern creation very fast and easy. I recommend that artists at least look at Artlandia website and try out the demo versions for Photoshop and Illustrator plug-ins. Also read the user comments and see what artists have to say about SymmetryWorks! Note: There are no user comments for SymmetryShop 3.

Make sure that you read the comments section of this article! Artist Dori Melton has used Artlandia software and comments on problems that she had with it.

I welcome any comments and additional information pertinent to this article. Please write them in the below comment section.

Tuesday, January 12, 2010

Templates for Product Mockups - Another Great Package Available

Wow! Artists now have a choice in choosing from three different mock-up template packages to help them create product mock-ups to showcase their art to manufacturers. All three packages are different and the artist biggest challenge will be in deciding which package(s) to purchase.


Phyllis Dobbs has introduced "Create Product Mockups." It is a mock-up package of 93 templates for a wide variety of popular licensed products categories with free updates as more mock-ups are added. The templates were created with vector lines in Adobe Illustrator and can be used in Adobe Photoshop, Adobe Photoshop Elements, and Adobe Illustrator. Note: Illustrator artists may be especially interested in this package because it includes drawings of the mock-ups not only in Photoshop file format but also Illustrator file format.

See the description of the other two product mock-up packages in "Templates for Product Mockups - 2 Great Packages Now Available."

Wednesday, December 23, 2009

Making Mockup Products as Gifts

I'm so use to making digital mock-up products to showcase my art that I decided that it was time to make some REAL mock-ups as gifts for friends. That way I could give them a sample of my art on a product assembled by me.

I purchased some blank cardboard boxes at a local independent hobby store. The boxes I purchased were 3-1/4 by 2-1/4 by 1-1/2 inches with a snap on the lid but of course any size or shape can be used.

I created art to fit the top of the box and used double-sided tape to adhere it to the lid. White glue or even decoupage glue can also be use. To give the box a little pizzazz, I glued a ribbon and jewel on the bell. My boxes were decorated very simply but you can go much further to make them really standout. Craft stores carry so many embellishments for scrap booking that there is an endless assortment to choose from.

The final touch is to fill the box with wrapped candy. Potpourri, a candle, or anything else could also be placed inside the box. And once the candy has been consumed, the box can be used for other things or placed on a shelf as a reminder that it was received from a friend.

Have a wonderful holiday!
Joan

Monday, December 14, 2009

Tip: How to Accessorize Product Mockups

Making mock-ups helps manufacturers visualize how art looks on products and is a good marketing technique that many artists use. Whether mock-ups are created digitally and look realistic or sketched and not look realistic does not matter. All that is needed is to show how the art looks on different kinds of products. For some product mock-ups, it helps if they are accessorized so that there is no guess work in their use. Below is an explanation on how I accessorized some product mock-ups.

Shown is a mock-up of bathroom products with my coastal art. If I did not have tissue sticking out of the box, a toothbrush out of the jar, and a spout on top of the second jar it would be difficult to know the intended use of the shapes. The tissue box was created in Photoshop using the techniques that is shown in "Photoshop Tip - Using the Transform Command for Product Mock-ups" and "Photoshop Tip - Creating Gift Bag Mockups." While in Photoshop I created a slot on top of the box mock-up, took a digital photo of actual tissue, edited the photo, and placed it on top of the tissue box to accessorize the mock-up.

For the tooth brush holder, I created the jar shape and mapped the art onto it while in Adobe Illustrator by using the techniques shown in "Illustrator Tip: Mockups - Creating Uniue 3D Product Shapes." I took a picture of a generic shaped toothbrush, edited it in Photoshop, imported the jar that I created in Illustrator, added holes to the top of the jar, and placed the brush into one hole. The soap/hand lotion dispenser was essentially done the same way. In this case, I took a picture of a generic spout, edited it in Photoshop and placed it on top of the jar that was created in Illustrator.

Warning: If product mock-ups are too realistic looking,manufacturers may think that the art on them have already been licensed. To avoid confusion, I recommend that you use signage stating that the art is available for licensing.

Tuesday, November 3, 2009

Templates for Product-Mockups - 2 Great Packages Now Available

You don't have to search any longer for templates to create product mock-ups because two great products are now available. Industry leaders Tara Reed and J'net Smith have each recently introduced packages of template mock-ups that are ready to showcase your art. If I was in the market to purchase mock-up templates, I would purchase both of these packages. Each offers great information that I think compliments each other. Information about the two packages is below. Note: The reason why I am not planning on purchasing these packages is because I already have a slew of mock-up templates that I have created. Although, I am really tempted!


Tara Reed has introduced "Product Mock-UP Magic." The package is composed of 46 Photoshop files with professional photographs of stationery, tabletop and gift industry templates on a CD. Included are nine video tutorials with more than two hours of instructions in applying art/patterns to the mock-ups.

J'net Smith has introduced "PCLS Collections and Presentations Package with 107 Product Template!" This e-book has 107 product templates, instructions on how to apply designs to the templates, and articles on how to create marketable collections and develop art licensing presentations for eight essential licensing categories.

Update:  A third mockup template product is available.  Read "Templates for Product Mockups - Another Great Package Available."   And to see a comparison of all three packages, read "Product Mock-up Templates & comparison of template packages."     

Friday, October 30, 2009

Art Collection & Mockup Examples

Pictured below are more examples of art collections that art director Joanne Fink of Lakeside Design has generously shared of artist Mary Gartner's Snow Flurry, Sweet Easter, and Valentine art collections. These collections illustrate that collections can be successful collections even if they are composed of a limited number of some elements (central images, patterns, borders, icons). For instance, the Snow Flurry and Valentine collections each have MANY central images but the Sweet Easter collection only has one. Yet, the Sweet Easter collection is still a successful collection because it has many icons related to the central image that can be used for patterns and borders. The Snow Flurry collection doesn't have many borders but because it has many central figures, more borders can be created if needed. Learn more about art collections by reading "What are Art Collections and Why Create Them?" To see more collections and product mock-ups, go to the "Art Collections / Mockups" section of this blog.

Friday, October 23, 2009

Photoshop Tip: Mockups - A Simple Method to Create Realistic Bedroom Linens & Curtains

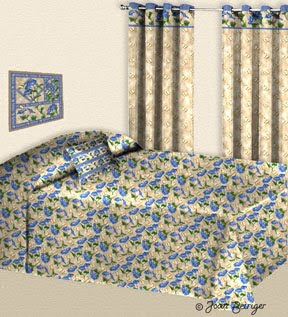
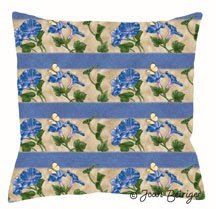
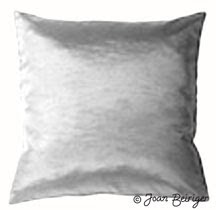
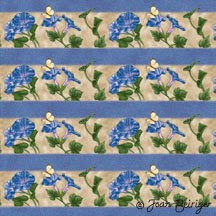
If you want to WOW manufacturers and really showcase your art with mock-ups for bedroom linens and curtains, you can easily do it in Photoshop. The key is to use templates that have realistic shading and then blending the art (pattern) layer with the template layer by using Photoshop's layer modes. The curtain, bedspread, and pillow example at the left was created by using this technique. The most time consuming part of the process is creating the templates. I made mine by taking pictures of actual products, simplifying them (removed patterns and backgrounds) and converting them to gray scale in Photoshop. Spending the time to create templates is worth the effort because they can be used over and over again. This tutorial shows how to create a pillow mock-up with one of my morning glory patterns.
Warning: If product mock-ups are too realistic looking,manufacturers may think that the art on them have already been licensed. To avoid confusion, I recommend that you use signage stating that the art is available for licensing.

1. Create a shaded pillow template by either taking a picture of a generic pillow or drawing & shading one. Then open Photoshop and place the pillow template on a layer.


2. Place the art (pattern) in a separate layer above the pillow template layer. Move and/or resize the pattern so that it covers the pillow template.
3. Go to the pillow template layer and select the outside of the pillow with the magic wand tool (Mac & Windows = W).


4. Go to the pattern layer and hit the delete key. The pattern is now in the shape of the pillow.
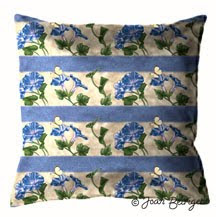


5. Select the multiply mode by pulling down the pop-up menu at the top of the layers pallet. Voila! You now have a realistic looking pillow. Simple isn't it?

Note: If the pillow is too dark, merge the two layers together, and use the Curves Tool (Mac = Command + M; Windows = Ctrl + M) to lighten it.

Monday, October 19, 2009

Illustrator Tip: Mockups - Creating Unique 3D Product Shapes

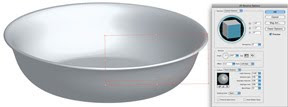
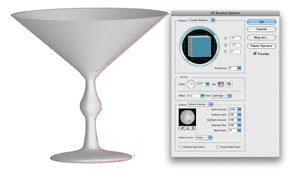
By using Adobe Illustrator 3D effects, you can create your own unique product shapes, map your art onto the surface and rotated the shape and art to any position you wish. This tutorial shows you how to create complex shapes for a vase, a bowl, and a cocktail glass. Before following this tutorial, I suggest that you first read "Illustrator Tip: Mockups (Step 1) - Creating Simple 3D Objects" so that you know the basics in creating 3D objects. Also read "Illustrator Tip: Mockups (Step 2) - Placing Art onto 3D objects" because mapping art onto 3D objects is not covered in this tutorial. Once you understand the concept in creating complicated product shapes, you'll be able to make an endless variety of product objects to showcase your art.

Warning: Product mock-ups can look realistic when art is placed on 3D objects. If they are too realistic looking, mock-ups may look like actual products and manufacturers may think that the art on them have already been licensed. To avoid confusion, I recommend that you use signage stating that the art is available for licensing when you use realistic looking mock-ups in marketing materials.

Basic Shape for a Vase
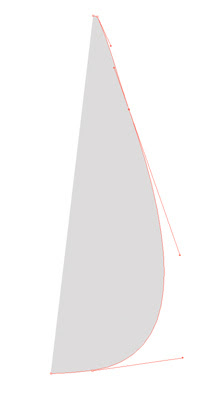
The first step in creating a complex 3D object is to create half of the shape's side view by using the pen tool (Mac & windows = P). Note: I recommend that you do not use the brush or pencil tool to create the shape because they lay down too many anchor and beizer handles which makes the shape bumpy. It also takes longer to render the shape into a 3D object if there are too many points. Using the pen tool can be tricky and frustrating at first. If you don't know how to use it, view a tutorial on youtube.com to learn the principles in using the pen tool.

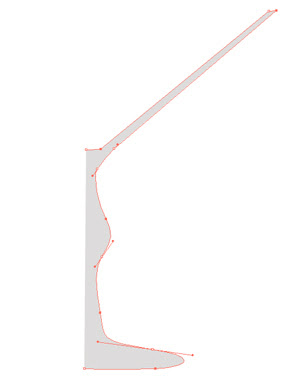
The example at the left shows that I used a minimum number of anchor points and beizer handles to define the shape and that I did NOT close the path. In other words, the last point at the top of the shape and at the bottom of the shape are not joined together. This is important in creating 3D objects. Also notice that I did not draw a path all the way across the top of the shape. The reason is create a hole in the middle of the vase. Although, if you look down the hole, it will not be straight but a wedge. Drawing only the outside is a fast method when you do not need to see the inside of the shape. I also did not place a beizer handle in the middle of the curve. It is easier to get a smoother curve that way.

Choose a fill color in the color menu at the bottom of the tool bar but don't choose an outline color. I chose a light grey for all the examples.

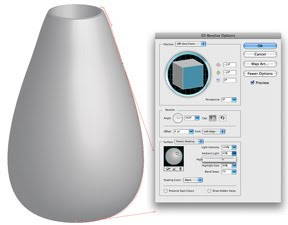
The second step is to click on the shape to select it. Then go to Effect on the Menu bar (at the top of the monitor) and select 3D Revolve. The 3D Revolve Options window pops up. Select the preview button so that you can see the shape as a 3D object and make any adjustments you wish. Note: It is best to experiment with the different adjustments so that you become familiar on how they affect the position and shading of the object.


Basic Shape for a Bowl
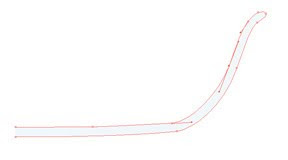
You essentially do the same steps as were done in the above example but creating a shape for a bowl is more complicated than for the vase. Because you can see the inside of the bowl, you need to draw essentially the thickness of the bowl. Notice that I did not close the path between the upper and lower points on the left side of the shape. Below is what the bowl shape looks like once the 3D Revolve effect is applied.


Basic Shape for a Cocktail Glass
A shape for a cocktail glass is a little more complicated to draw than the other examples. However, the same principal and steps apply. And once again I did not close the path between the inside and base of the glass. Below is what the glass shape looks like once the 3D Revolve effect is applied.


Saturday, October 17, 2009

The Dynamic Duo #2 - Examples of Art Collections & Mockups

Pictured below is another series of collections and product mock-ups that art director Joanne Fink of Lakeside Design has generously shared of artist Mary Gartner's art - Jolly Joy ( three 8-1/2 x 11 inch sheets of collections and three sheets of product mock-ups) and Santa's Visit (two sheets of collections and two sheets of product mock-ups). Notice that these two collection have scads of icons that made it possible for Mary to create a huge variety of product mock-ups such as wraps, note pads, list pads, pencils, tags, seals, stickers, gift bags, magnets, cards, boxes, etc. Also notice that the mock-ups for the Jolly Joy collection have been created so that they go together as a complete product line and that Mary even included a mock-up of the product packaging (shown on the right hand side on the third picture).

To see more examples of art collections & mock-ups, and also tutorials on how to create them go to Art Collections / Mockups section of this blog for articles on collections and mock-ups.

Jolly Joy Collection and Product Mock-ups created by Mary Gartner


Santa's Visit Collection and Product Mock-ups created by Mary Gartner


Wednesday, October 7, 2009

Art Collection Examples

Pictured are more examples of art collections that art director Joanne Fink of Lakeside Design has generously shared of artist Mary Gartner's Witch Bootique, Easter Traditions, and Nautical art collections. All of these collections are composed of central images, patterns, borders, icons, and art formatted in several ways. They are ready to be used on all sorts of products. Learn more about art collections by reading "What are Art Collections and Why Create Them?" To see more collections with associated product mock-ups, go to "The Dynamic Duo #1 - Examples of Art Collections & Mockups."

Monday, October 5, 2009

Illustrator Tip: Mockups (Step 2) - Placing Art onto 3D Objects

In this tutorial, I will show how to place art onto 3D objects that have been created in Adobe Illustrator. If you do not know how to create 3D objects, read "Illustrator Tip: Mockups (Step 1) - Creating Simple 3D Objects" to learn how to create them. Warning: Product mock-ups can look realistic when art is placed on 3D objects. If they are too realistic looking, mock-ups may look like actual products and manufacturers may think that the art on them have already been licensed. To avoid confusion, I recommend that you use signage stating that the art is available for licensing when using realistic looking mock-ups in marketing materials.

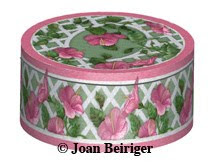
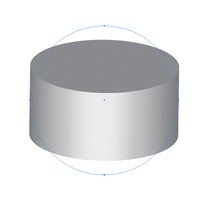
1. Open an Illustrator file of an already created 3D object. This tutorial shows an example of a 3D round shaped object (for a box/tin mock-up) for art to be placed (mapped) onto the top and side. I used the ellipse tool in Illustrator and applied the 3D effect to create the object at the left.
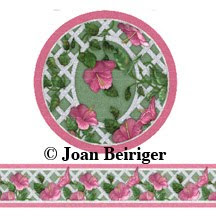
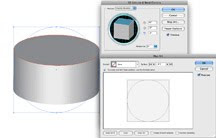
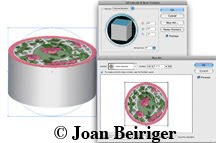

2. In this tutorial, I will use my hibiscus floral art at high resolution (300 dpi) and created in a round shape for the top of the object and in a border for the side.
3. Make a new layer and either drag the round art from an opened Adobe Photoshop file, an Adobe Illustrator file, or use the place command in Illustrator to put the art on the layer. Do the same for the border art. Note: The border art should be long enough to go at least half way around the circumference of the object. When you rotate the 3D object, you want the art to "appear" to cover the entire circumference. I used a 1-1/2 by 18 inches border for this tutorial and it was too long.
4 The art has to be a symbol in Illustrator to place the art onto the object. To make art a symbol select one of the art pieces, open the Symbols Panel (Mac = shift + command + F11; Windows = shift + Cntl + F11), click the New Symbol button. Name the symbol and select the type of symbol as graphic. Press okay and the art will appear in the Symbols Panel. Do the same for the other piece of art.
5. Go to the layer that has the object on it and select the object. In the Appearance window (shift + F6), double click 3D extrude and bevel to open the window. Click on Preview so that the object looks 3D (if it does not) and click on Map Art. The Map Art window opens.


6. In the Map Art window, make sure the top surface is selected in the Surface slider bar. Click Preview and select the round art from the Symbol pull down. Click on the "Scale to fit" button at the bottom of the window.
7. Select the side of the object from the Surface slider bar and then select the border art from the Symbol pull down. Move the art and adjust the size so that it fills the surface. Click on Shade Artwork and then click Ok to exit the Map Art window.
8. In the 3D Extrude & Bevel Options window you may wish to adjust the rotation of the artwork with the custom rotation box. Also you may need to alter the surface shading. When I did the example, I found that the top of the object was too dark so I moved the light source to the top and then added a second light source to shine on the front side of the object with the Surface ball. When finished, click Ok to exit the 3D Extrude & Bevel Options window.
9. Use the pen tool to make a curved line on the mock-up to simulate the division between the lid and base of the box.

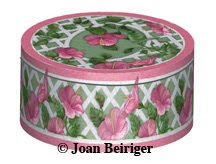
Voila! You now have a mock-up that can be exported as a jpg or another file format so that it can be used in Photoshop for use in creating marketing materials.


Copyright © 2009 Joan Beiriger

Saturday, October 3, 2009

Illustrator Tip: Mockups (Step 1) - Creating Simple 3D Objects

You can create amazing three dimensional (3D) products in Adobe Illustrator and then place your art onto the surface(s) to make outstanding mock-ups. In Illustrator all kinds of 3D shapes can be created such as bowls, cups, plates, and vases. For more information read "Adobe Illustrator - Creating 3D Product Mockups."

I found that creating 3D objects and placing art on them is easy to do once you know how but explaining it in a tutorial can be quite long. Thus, I am going to do a series of tutorials. This first tutorial will show you how to create simple shapes and convert them into 3D objects. Later tutorials will show you how to place (map) your art onto the surface(s) of the objects and how to create more complex objects. Simple 3D objects can be used for all kinds and shapes such as decorated boxes, gift bags, stationery products (books, notepads), and candles.

View three videos by two different people to help you understand the method in creating 3D objects and make it easier to follow the steps in my tutorial. In fact, watching the videos may be all that you need. But I decided to also include a written step-by-step tutorial for those of you that learn easier that way.
1. Part one video on creating 3D objects.
2. Part two video on creating 3D objects.
3. A video that is a little more detailed in creating 3D objects.

I assume that you know how to use the basic tools and commands in Adobe Illustrator. Use the help package in Illustrator if you don't know how to access some of the tools that I mention. The following shows you how to create a six sided box.

1. Open a new document in Adobe Illustrator. Then open the layer window (Mac = F7 key) and choose a new layer.
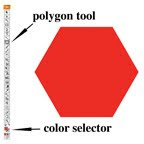
2. Choose a fill color in the color menu at the bottom of the tool bar but don't choose an outline color.
3. Choose the polygon tool on the tool bar. It is in the same pull down menu as the Rectangle Tool (Mac & Windows = M). Note: the default polygon is six sided but you can alter the number of sides by double clicking in the window when the polygon tool is selected. A menu pops up where you can choose the size and number of sides of a polygon.

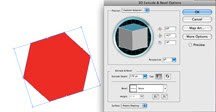
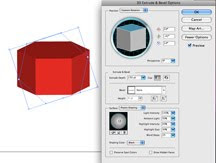
4. To create an object with the polygon shape, click on the shape to select it. Then go to Effect on the Menu bar at the top of the monitor, choose 3D, and then Extrude & Bevel. The 3D Extrude & Bevel Options window pops up for editing the object as viewed at the left.

5. Select the preview button in the window so that you can see the shape as a 3D object.
6. You can rotate the object by moving the box in the 3D Extrude & Bevel Options window. To increase or decrease the depth of the object, change the Extrude Depth value. Choose a closed cap to cover the top and bottom of the object or an open cap to show a tube of the object.
7. Click on more options (right side of window) so that you can access the lighting tools. Move the square on the ball to move the lighting source on the object. You can also adjust the intensity, ambient light, intensity, size and blending of the light. More lighting sources can also be added by clicking on the middle icon at the bottom of the lighting window. In my example, I used one lighting source, an extrude depth of 150 pts with no bevel, and a closed cap.
8. When finished, click okay to exit the option window. If you want to later change some of parameters in the 3D Extrude & Bevel Options window, simply select the object and go to the appearance menu (Mac = shift + F6) and select 3D Extrude & Bevel for that window to open. Note: The object can be exported as a jpg or other file formats so that they can be used in Photoshop. However, you may want to wait until your art is placed on the object before exporting the file. Read "Illustrator Tip: Mockups (Step 2) - Placing Art onto 3D Objects" to learn how to create 3D objects

The examples shown in the picture at the top of this article are a variety of objects that can be created in Illustrator by using the polygon, ellipse (oval shape), rounded rectangle, star tools and converting them into objects with the 3D effect. A bevel was applied to the edge of the pink oval while in the 3D Extrude & Bevel options window. To make the objects look like products, I put a line around the green box so that the object looks like it has a lid; put a clip art icon on the pink oval; drew three ovals to simulate pencil holders on top of the blue box and put a pencil clip art icon into one hole; and placed a verticle line on top of the yellow star to simulate a candle wick.

Thursday, October 1, 2009

The Dynamic Duo #1 - Examples of Art Collections & Mockups

My definition of the dynamic duo in art licensing is the creation of art collections and product mock-ups that showcase art themes. Creating both gives artists an advantage in licensing their art. Learn more about art collections by reading "What are Art Collections and Why Create Them?" and about product mock-ups read "What are Product Mockups and Why Create Them?"

Thanks to the generosity of artist / art director Joanne Fink of Lakeside Design, I will be doing a series of posts showing art collections and mock-up examples that Lakeside Design have created. Today's post illustrates that a collection of patterns can not only be used for fabrics, gift wraps, and scrapbooking but also other products.

Below are two 2-page layouts of Joanne Fink's Nordic Christmas collection patterns with greeting card, mug, pillow, and rectangular candle product mock-ups.


Below is a two page layout of Eileen Biedrzycki's Christmas Time collection patterns with giftbag, greeting card, and pillow product mock-ups.


Below is a two page layout of Diana McMackin's Snowflake Elegance
collection patterns with mug, pillow, album cover, note paper, and file box product mock-ups.