


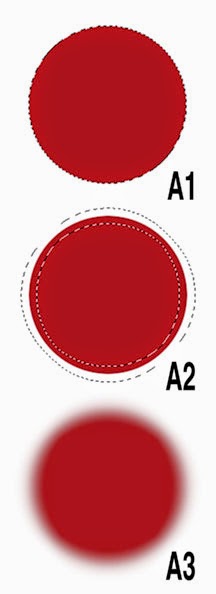

 • Modify Selection Border Command
 Use the modify selection border command plus the Gaussian blur filter to create a color fade around the motif.
1. Use the Magic Wand tool and click on the image to select it. See A1.
2. Pull down the Select window, open the Modify window, and select Border (Select/Modify/Border).
3. Decide on the number of pixels wanted for the border and enter it. Press okay. 100 pixels were used for example A2.
4. Pull down the Filter window, open the Blur window, and select Gaussian Blur.
5. Enter the number of pixels wanted for the blur and enter it. Click on okay. Press the Command key plus D to deselect the image. 50 pixels were used for example A3.
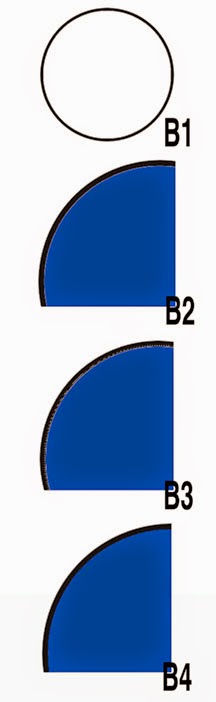
•Modify Selection Expand Command
Use the modify selection expand command to remove the white space between the black line and filled blue color on the motif.
1. Example B1 shows the outline circle motif that will be filled with a blue color.
2. Choose the color you wish and use the paint bucket tool to fill the center of the motif. Note: An unwanted one pixel space between the black outline and blue circle occurs. See B2.
3. To remove the white space, open Select/Modify/Expand. Enter 2 pixels in the box. B3 shows the selected area (may not be able to see the selected area on your monitor) that is slightly on top of the black line. Click on okay. B4 shows that the white space between the black and blue is no longer visible.
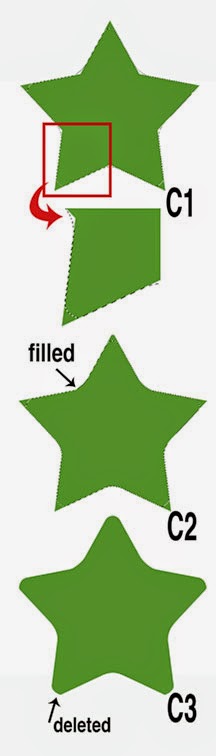
• Modify Selection Smooth Command
Use the modify selection smooth command plus the brush tool and delete command to alter the shape of the motif.
1. Use the Magic Wand tool and click on the image to select it.
2. Pull down the Select window, open the Modify window, and select Smooth (Select/Modify/Smooth).
3. Decide on the number of pixels wanted to round the corners (points on the star) and enter it. Click on okay. 100 pixels were used for example C1.
4. Fill the inside corners of the star with the same color of the motif by using the brush tool. See C2.
5. Pull down the Select window and select Inverse. Press the delete button on the keyboard. Press the Command key plus D to deselect the image. See C3.
Note: Notice that each rounded point on the star is not uniform. This is probably due to an artifact of the "smooth command" software. The software may do a better job on different shaped motifs.
• Modify Selection Contract Command
Use the modify selection contract command plus the delete command to create an outline of the motif.
1. Use the Magic Wand tool and click on the image to select it. See D1.
2. Pull down the Select window, open the Modify window, and select Contract (Select/Modify/Contract).
3. Decide on the number of pixels wanted for the outline and enter it. Click on okay. 100 pixels were used for example D2.
4. Press the delete button on the keyboard. Press the Command key plus D to deselect the image. See D3.
Note: Notice that some of the "points" inside the star are not sharp. This is probably due to an artifact of the "Contract command" software. The software may do a better job on different shaped motifs.
• Modify Selection Feather Command
Use the modify selection feather command plus the delete command to create a feathered effect on the motif.
1. Use the Magic Wand tool and click on the image to select it. See E1.
2. Pull down the Select window, open the Modify window, and select Feather (Select/Modify/Feather).
3. Decide on the number of pixels wanted for the radius and enter it. 100 pixels were used for example E2. Click on okay.
4. Press the delete button on the keyboard. Press the Command key plus D to deselect the image. See E3.
Your comments are welcome. Click on the comments section (below) to write your comment. Note: Some people have a problem in leaving a comment. The most successful method is to comment as Name/URL (your name and website or blog with a "complete" URL address).
Beautifully explained, and I am sure to return to this tutorial.
ReplyDeleteJoan...there IS always something else in Ps. I am amazed had how much I still don't know. Thanks for this. Very much appreciated as always.
ReplyDeletewhat fun, definitely bookmarking this, thanks
ReplyDeleteVery helpful, Joan. Thanks.
ReplyDelete