


 You can paint a background, scan it and use it for patterns and backgrounds in your art collections. Or, you can use the filter commands in Photoshop to create a cornucopia of textured backgrounds. But to make the filters work properly, you need to know several things. 1. The file needs to be in the RGB mode (image / mode / RGB color) to access all the filters. 2. The filter is applied to the entire layer in Photoshop. 3. A color needs to be applied to a layer before a filter will work on that layer. 4. Multiple colors or shades of color on the layer is needed to optimize the effects of many of the filters.
 Color can be placed on a layer with the paint brush, the bucket tool, the gradient tool, or even using a filter command. I used the filter Clouds command to apply paint on a layer for the examples in this tutorial (Example 1). Below are only a few examples on using filter commands. So many more can be created and some really interesting ones can be produced by using multiple filters on the same layer. Hints: 1. Simple and understated textures should be used behind central images so that the textures do not overpower the images. 2. Textures show up better if the colors are a combination of light and dark. If the colors are the same intensity, some of the filters do not show the textures well.

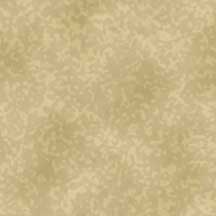
Step 1 - To create a mottled looking texture as shown in the example, click the foreground color picker window on the tool bar and enter the following numbers in RGB - 199 ( red) 178 (green) 120 (blue) and click okay to close the window.
Step 2 - Click on the background color picker and enter 244 227 180 RGB numbers and close the window.
Step 3 - Select Filter on the Command bar at the top of Photoshop window, then select Render in the Filter window, and then Clouds in Render window.
 Example 2: Sponge Texture
Step 1 - Create a Clouds Texture as shown in Example 1.
Step 2 - Select Filter on the Command bar at the top of Photoshop window, then select Artistic in the Filter window, and then Sponge in the Artistic window.
Step 3 - Adjust the brush size, definition, and smoothness. Press OK to apply the filter to the layer.

Step 1 - Create a Clouds Texture as shown in Example 1. Note: A solid color in the layer also works for this filter.
Step 2 - Select Filter on the Command bar at the top of Photoshop window, then select Texture in the Filter window, then Texturizer in Texture window, and then select sandstone in the texture pull down.
Step 3 - Adjust the scaling, relief, and light location. Press OK to apply the filter to the layer.
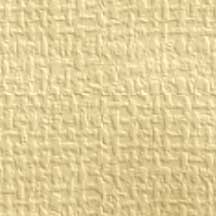 Example 4: Burlap Texture
Step 1 - Create a Clouds Texture as shown in Example 1. Note: A solid color in the layer also works for this filter.
Step 2 - Select Filter on the Command bar at the top of Photoshop window, then select Texture in the Filter window, then Texturizer in Texture window, and then select burlap in the texture pull down.
Step 3 - Adjust the scaling, relief, and light location. Press OK to apply the filter to the layer.

Step 1 - To create a mottled looking texture as shown in the example, click the foreground color picker window and enter the following numbers in RGB - 232 ( red) 220 (green) 27 (blue) and click okay to close the window.
Step 2 - Click on the background color picker and enter 182 83 24 RGB numbers.
Step 3 - Select Filter on the Command bar at the top of Photoshop window, then select Render in the Filter window, and then Clouds in Render window.

Step 1 - Create a Clouds Texture as shown in Example 5.
Step 2 - Select Filter on the Command bar at the top of Photoshop window, then select Distort in the Filter window, and then Ocean Ripple in the Distort window.
Step 3 - Adjust the ripple size, and the ripple magnitude. Press OK to apply the filter to the layer.

Step 1 - Create a Clouds Texture as shown in Example 5.
Step 2 - Create Ocean Ripple Texture as shown in Example 6.
Step 3 - Select Filter on the Command bar at the top of Photoshop window, then select Distort in the Filter window, and then Glass in the Distort window.
Step 4 - Adjust the distortion, smoothness, texture, and scaling. Press OK to apply the filter to the layer.

Step 1 - Create a Clouds Texture as shown in Example 5.
Step 2 - Create Ocean Ripple Texture as shown in Example 6.
Step 3 - Select Filter on the Command bar at the top of Photoshop window, then select Distort in the Filter window, and then Wave in the Distort window.
Step 4 - Adjust the number of generators, wavelength, amplitude, scale, type of wave, and wrap around or repeat. In the example above the following values were used - generator 1; wavelength 367min , 587max; amplitude 244 min, 999 max; scale 100 %, 69 % vertical; square type; wrap around.
Step 5 - Press OK to apply the filter to the layer.
As you can see all sorts of textures can be generated with Filters in Photoshop. This tutorial only used a few colors in the examples. Amazing textures can be created with a combination of more colors and applying several filters to the layer. Have fun experimenting because the sky is the limit!
Comments and suggestions are welcomed. Please click on comments and write them in the comment window at the bottom of this article.
Boy you are just a wealth of information, Joan. Thank you so much for sharing once again. I know now what I can do to add interesting backgrounds when I outline flowers for designs. So many times I have felt stuck. Thank you.
ReplyDeleteRachel
I use photoshop filters howver you can get so many varitaions it just opens your creativity. Great post.
ReplyDeleteThanks for sharing your knowledge, Joan. I find that taking high res scans of regular household items--sandpaper, old fabric, old paper, wallpaper, dried flowers, etc., make for the most wonderful textures. When you put them on their own layers at different modes/opacities/fills, the richness of the textures is truly unparalleled. :)
ReplyDelete